How To: Make an AC Arc Welder Using Parts from an Old Microwave, Part 1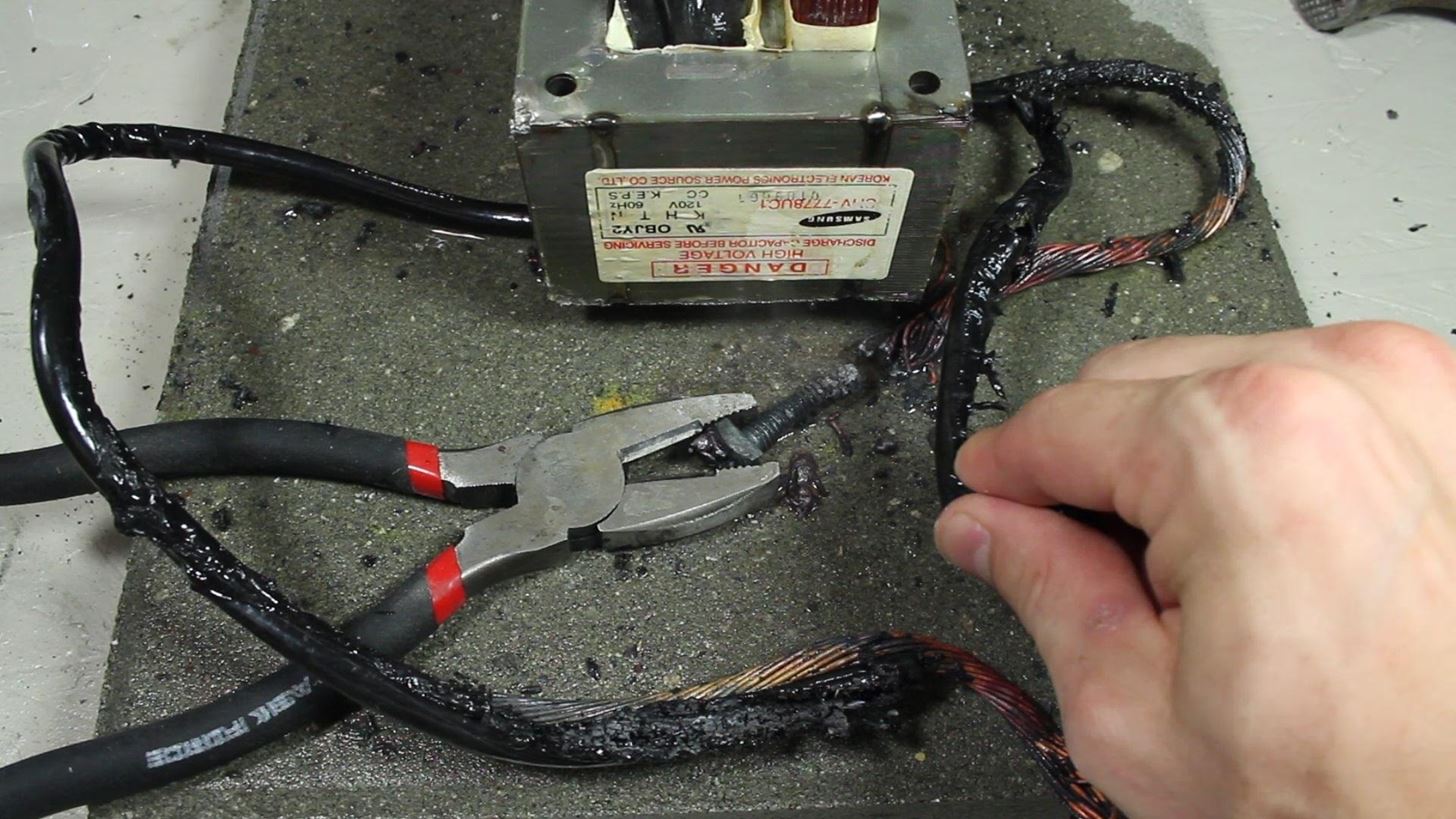
In a previous article, I demonstrated an Arc Welder made using parts from old microwave ovens. Please enable JavaScript to watch this video.
Here is part 1 of 2 on how that arc welding machine was made, and how you could make one too! This is the first of two parts on building it, focusing on the modification of the transformers. Please enable JavaScript to watch this video.
WARNING: Stick welding, and/or the modification of a Microwave Oven Transformer (M.O.T), can be very dangerous and presents risks of UV radiation, shock hazards, burns, fires, fumes and a multitude of other risks. This project should not be attempted without a thorough understanding of electricity, adult supervision and adequate training. Misuse, or careless use, of tools or projects may result in serious injury and/or death. Use of this content is at your own risk. In a previous project, I melted the lead wires on my first metal melter. But the transformer core was still in great condition, so I re-used it to make an AC stick welder!The arc welder made sparks fly, but in the end, it wasn't enough power to make the metal stick, and the pieces of work would break apart with very little effort.If I tried pumping more power into the welder, the wires would overheat and melt.So to address this challenge, we'll be using 2 MOTs (Microwave Oven Transformers), because more transformers means more power! Preparing the MOTs for a new secondary is exactly the same as the first few steps we took in the Metal Melter project. As it's a little redundant, I won't spend much time on the step-by-step instructions for that, but if you haven't seen it yet, you can check out the video, or reference my previous article. To make life a lot easier, you're going to need to build a little jig for winding your secondary. It's unlikely you'll get all the required turns of wire in such a tight space without one.To make this jig, I used a piece of scrap wood and cut it so that it was as wide as the center of the transformer, and just a little shorter than the top. The length was cut so that it overhung about 1/2" from the ends.I screwed wood panels on the top and bottom to guide the wires and keep them in place, then folded a piece of paper so that it fit in the groove.Once mounted in a bench vice for leverage, the cable can be wound on.For this project, try to round up around 50'of 8 AWG stranded copper cable from a local hardware store. You could probably save some money by scavenging for free wire, but I decided to look at the "end of coil" section at the hardware store, and was able to negotiate a deal for half price on the cable, so the 50' only cost me about $17.These modified MOTs will need a new secondary that is 18 turns of the 8 AWG cable, and both MOTs will be tied together in series. I also found I needed to run the system on 240 volts AC to get the power output for good welding. My goal was 30+ volts AC with a variable amperage from 0-120+ Amps.In practical terms, this means you need to wind the coil on the form so that you end up with 6 cable lengths high, and 3 cable lengths wide. Oh yeah, and it all needs to be able to fit back in the transformer, so wind it tight!The first layer isn't too bad, but winding the second layer, and third get progressively more difficult, and may seem near impossible.Once you get the 18 turns of wire to fit in the groove, you can fold the paper over, and tape it together to help the coil hold together.Here's the tricky part .. get it off the jig without letting it unravel!The top and bottom panels can be removed, and the block pushed out from the center of the coil. I used electrical tape to make sure the coils stayed tight. Putting the secondary coil in the transformer is a very tight fit.I had the best success by using a set of clamps to squeeze the sides of the coil in, while I used a rubber hammer to gently tap the coil down.When it's in, the coil had better fit below the top edge of the transformer, otherwise you won't be able to get the top back on.Securing the top on is the same as in the Metal Melter project as well. Basically, use 2 part epoxy glue to cover the entire top surface, then replace the iron lid and press it together tightly in clamps or a large vice.It's extremely important to have a lot of pressure on the joint while the epoxy is setting. I let mine set for about 24 hours.The modified transformer is complete! The secondary coil is so tight in there, that any vibrations from the 60Hz mains power will be kept to a minimum. When both transformers are modified in the exact same way, we've basically got what we need for welding. All that's left is to clean it up a bit and make it more useful and presentable. By the way, these two exposed wires from the secondaries will become our ground clip and stinger.Well, there they are! The basic makings of an AC stick welder. From this point, it isn't difficult to finish the system up into a nice little hobby welder. Watch how to do that in Part 2. Please enable JavaScript to watch this video.
If you haven't see the video yet, it's not too late. Watch it here!If you like this project perhaps you'll like some of my others. Check them out at thekingofrandom.com.
I'm afraid that you cannot view your past Instagram comments. From past three years, nothing changed here, and probably nothing will. In 2017, there is no such feature in the native Instagram app.
Don't miss all of our CES 2015 coverage! With the base accessory, the Wocket is about the same size as a normal wallet, and consists of a reader, a slot for the WocketCard, and a slot for your driver's license or other ID card.
This smart wallet easily consolidates your credit cards into
How To: Save Custom Shooting Presets in Filmic Pro So You Don't Have to Adjust Settings Later for Similar Shots How To: The Best Video Recording Apps for Your iPhone How To: Automate Focus, Zoom & Exposure Changes in Filmic Pro for Smoother Pull Operations How To: Automatically Delete Your Google History on a Schedule
FiLMiC Pro v6: Log Video on iOS by Eric Escobar - ProVideo
Warez Leecher Names - Ebook download as Text File (.txt), PDF File (.pdf) or read book online. Warez Leecher Names
News Roundup | Techrights - Part 85
techrights.org/category/news-roundup/page/85/?stories
If you want a Linux machine and don't want to worry that your build won't work, there are several vendors to choose from (one of which is Dell). If you want all your Steam games to work, the best choice of Linux to put on it (short of putting Steam OS on it) is Ubuntu Linux.
News Roundup | Techrights - Part 74
techrights.org/category/news-roundup/page/74/?stories__
In his book Busy, Tony Crabbe suggests between 10-20 friendships are in this category and you should spend all your time with these people rather than letting your time be spread thinly across superficial Facebook "friends". Facebook's two billion users milestone makes it bigger than China
The Hackers Manual 2016 | Linux Distribution | Desktop
How To: Build a perfect replica of a lightsaber for cheap or expensive How To: Lose weight fast using Jedi mind tricks (and without lifting a finger) News: Best Halloween Costume Ever How To: Hack together a Star Wars light saber
How to Make a Homemade Lightsaber from Junk! - WonderHowTo
EFS refer to a folder location called /EFS in Samsung's Android devices. It is a very sensitive folder hidden within the deepest core of your smartphone's internal file system and is very essential to the functions of our smartphones.
Cambridge Analytica used self-destructing email to cover its tracks Nix later adds that "we set our ProtonMail emails with a self-destruct timer [] so you send them, and after they've been
Snapmail Allows You to Send Self-Destructing Gmail Messages
The iPhoneHackers shows viewers how they can install Installous on their iPhone and Download free applications. First, you will need to have a Jailbroken iPhone or iPod Touch with Cydia. Your first step, will be to load Cydia on your iPhone. When Cydia has loaded click on 'Manage' and then 'Source
How to Install Installous 4 - YouTube
How to Count Calories & Log Nutrition with Samsung Health
You will see your mobile Samsung Galaxy S7's name in the corner of the open page of the unlocking tool. Click "apply" and wait for a while. With this simple command you actually give an order to the Unlock Samsung Galaxy S7 Code Generator. To use your details and enter the database. Of locked mobile Samsung Galaxy S7 devices.
How to Use Intelligent Scan to Unlock Your Galaxy S9 Faster
How to Scrub GPS Data from Your Photos. For Android. You'll need to (free) app called ImageOptim that is able to remove EXIF data (and reduce your image's file size). Simply drag and drop
How to Remove EXIF Metadata from Photos on Android
xda-developers Samsung Galaxy Tab S Galaxy Tab S Q&A, Help & Troubleshooting How to unroot and reset to stock by abcrndm XDA Developers was founded by developers, for developers. It is now a valuable resource for people who want to make the most of their mobile devices, from customizing the look and feel to adding new functionality.
0 comments:
Post a Comment