How To: Find and Shut Up Those Annoying Music or Video-Playing Tabs in Your Browser

How To: Find and Shut Up Those Annoying Music or Video-Playing Tabs in Your Browser

If you're the type of person who constantly uses multiple tabs in your browser, you know how annoying it is when one of them starts playing unwanted music or video.If you have a ton of tabs open, it can be next to impossible to figure out which one the sound is coming from—especially if it's an ad—and if you're in class or at work, that can be pretty embarrassing. For those of you using Google Chrome, there's a simple solution to hunting down that noisy tab. An extension called MuteTab shows you exactly which tabs are making noise and lets you mute individual tabs from a little icon in your address bar. Image via mutetab.com When you click on the little music note icon, it brings up a list of your open tabs and shows you which ones are currently playing music or video. From there, you can pause or mute the tab, close it, or mute all tabs at once.This is especially helpful in those cases when a loud music-playing ad seems to pop up out of nowhere, and it seemingly doesn't exist. Have you ever closed all of the tabs and windows just to find the music still playing? Yeah, well, this extension might help you find the culprit, but there are cases when this won't work, thanks to Chrome's settings.You can grab MuteTab for free over on the Chrome Web Store.Unfortunately, there isn't a similar add-on for Firefox users, but there are a few other solutions. With BarTab, you can put the tabs you aren't using on hold without closing them out. Tabs that are suspended will appear greyed out, and you can click to reload them anytime. Alternatively, you can disable autoplay altogether with an extension called Click To Play. It replaces Flash content with a static image that you can click on if you want the media to play. Image via wonderhowto.com To enable it in Firefox, type about:config into your URL bar, then dismiss the warning that appears. Type plugins.click_to_play into the search bar, then right-click on it and hit Toggle. Once you restart Firefox, the image above will replace Flash content.Know of any other extensions to help manage unwanted media? Let us know in the comments below.
Images by opacity, Hasloo/Shutterstock


For the new Messages app in iOS 10 has added a native GIF search feature! Using the feature, you'll be able to search for images and GIFs right inside the Messages app, and send it along in just a tap. Here's how it works. How To Send GIFs in Messages App. Open the Messages app and go to the conversation where you want to share the GIF.
How to Send GIFs with the Messages App on iOS 10 « iOS


24 hidden Android settings you should know about You can also access individual volume settings by pressing the physical volume button, which will make one slider appear on screen, and then
How to Assign Your Volume Buttons to Almost Any Task on Your


Samsung has finally rolled out the Android Oreo update for the Galaxy S8 and S8+. If you're just now getting the update, you'll be happy to know that your Galaxy just got upgraded with plenty of cool new features.
Android Oreo Galaxy S8 update - Every new features coming to


In this video from rscp1050 we learn how to SSH into a jailbroken ipod touch or iphone. First go into Cydia and search for SSH. How To: SSH into an iPod Touch 2G
iPod Touch Jailbreaking Info: How to SSH


Visit the post for more. Multiple icloud accounts on one iphone ipad how to transfer photos from icloud step 2 how to transfer photos from icloud step 1 how to merge data another icloud account with anytrans step 6


While Using the App: This will only allow Uber to access your location when the app is actually open on your screen. However, even with this setting, there are some special circumstances where Uber may still collect your location in the background, but the company claims that you will always receive a notice on the screen in such cases.
Here is How to Stop Uber From Tracking Your Location


This was all about viewing anyone's full-size photos on Instagram. As the above method will only allow you to see photos uploaded as posts in original size so now, let's get to profile pictures. See Instagram Profile Picture In Full Size. You cannot view someone's profile picture in full size on Instagram.
How to download photos from Instagram - A Hack | type phase


This Pin was discovered by Erin Thompson. Discover (and save!) your own Pins on Pinterest.
How to Deploy a Keylogger from a USB Flash Drive Quickly

How to Sideload Apps on iPhone in iOS 10 (Without Jailbreak)


Step 7: Adjust display colors . Now that you are on the main screen to calibrate the display, you will see a number of settings to suit your needs. Below we will explain each feature to help you better understand the impact it has on your display.
How to calibrate the colors of your Pixel 2 screen with


Otherwise, let's continue onto how the comparison points in this chart helped us find the top four sub-$400 phones for listening to music. Don't Miss: The Top 4 Premium Phones for Music Lovers & Audiophiles. Key Comparison Points
Top 10 Best Android Smartphones for Music Lovers


NXT-ID's Wocket Smart Wallet Named Number One Best Tech Gift for 2015 by Rethink Modern to replace your entire wallet with one single card. Then it uses some pretty cool high tech security
The Best of CES « Edit on a Dime :: WonderHowTo


Your iPhone is capable of multitasking, so you can listen to music and write an email at the same time. Instead of opening Music and going back and forth to another app, try one of the following: Swipe up from the bottom of any Home or app screen to open the Control Center. Adjust the volume and use the Rewind, Pause/Play, and Fast Forward buttons.
How to Pause Music & Podcasts on iPhone & iPod Touch Without
osxdaily.com/2014/08/19/pause-music-podcasts-iphone-ipod-audio-cable/
Rather than fish around with your finger to hopefully tap the "Pause" button in the Music app, Control Center, or Lock Screen of iOS, use this physical intervention instead: pull the audio cable out of the iPhone, iPod touch, or iPad to instantly pause whatever is playing, whether it's a song, podcast, audiobook.
iPhone Music Volume Too Low? How to Fix Volume Issues in the

How To: Upgrade Your Older iOS 7 Device with These iPhone 5S-Style Color Themes

How To: Upgrade Your Older iOS 7 Device with These iPhone 5S-Style Color Themes

The iPhone 5S may be the most popular Apple phone to date, but I'm still rocking my iPhone 4. No disrespect to the 5S, but I'm not upgrading until I can unlock with a retina scan or get Siri to sound like Scarlett Johansson.However, I wouldn't mind making my aging iPhone look more like the latest and greatest, and it can be done by changing the theme on an iPhone 4 to match the physical color schemes of the 5S. If you have a jailbroken iPhone 4, 4S, 5, or even a 5S, you can download the perfect theme to match the three iPhone 5S colors. It's called Anode, and gives your home screen a new Space Gray, Gold, or Silver look. Please enable JavaScript to watch this video.
If you want a clean theme that perfectly matches your 5S with over 160 supported app icons, then Anode was made for you. And best of all, unlike many of the cooler Cydia themes, this one is free.
Step 1: Make Sure You Have WinterBoardAs with most themes, you'll need WinterBoard on your jailbroken iOS device in order to install Anode's themes.
Step 2: Install Anode on Your iPhoneHead to Cydia, then go to Manage -> Sources -> Edit -> Add, then add the following address after the "http://":cydia.myrepospace.com/Anode/ Once you've entered the repo into Cydia, the themes should automatically be added to your WinterBoard. You can double-check by searching for Anode in the Search section of Cydia to see if there's a green check mark next to it. If there isn't, go ahead and install Anode just like you would any other Cydia app.

Step 3: Apply Your 5S ThemesIn WinterBoard, choose which of the three themes you want to try out, then Respring your device. Below, you can see what they all look like on my iPhone 4. The first is Space Grey, then Silver, and lastly Gold. Pretty cool, huh? Since my iPhone 4 is black, I think the Space Grey theme looks the best. Make sure to mess around with the background images as well if you want to get more pop out of the lighter themes.If you find a great wallpaper/theme combo, post your screenshot in the comments below.

How To: Use Your Android as a Microphone for Your PC

The Cool New Features in iOS 7.1 for iPad, iPhone, & iPod


Especially since notifications in iOS 12 are rich, meaning you can see conversations, images, and more directly from the Lock Screen. Doing so might mean you're actually on your iPhone more by virtue of being able to do so much without unlocking the device.
How to Customize the Windows 10 Lock Screen - Gadget Hacks


The Samsung Gear S is one of those. This is Samsung's sixth smartwatch in a little over a year, but it has one big difference: it gets its own cell service and data. It even has its own SIM-card slot.
Samsung Gear S3 Smart Watch | Samsung US


Remove the headphones and connect them again. Both speakers and headphones will start appearing as separate devices in the Volume Mixer. You can now manage their volumes independently. Windows will remember the level for each one and when you connect the headphones, it will automatically adjust the volume to the last set for the device.
VolumePanel lets you set individual volume levels for each app


The cell phone may have replaced the pocket watch, but thanks to some clever mods and hacks, "old-fashioned" time telling is making a comeback. Smart watches that connect to your mobile device cannot only tell you what time it is, but also change the song you're listening to and let you know how many Facebook notifications are waiting for you.
How to Add Back the "Clear All" Option for Notifications on


Change font size and style in iPhone and iPad, Most of the iOS user never convenient ordinary text size and style, most of are finding the way of update text size and style in the message, email and other text apps. So in iOS 7, iOS 8, iOS 9, iOS 10, iOS 11 on iPhone …


Using the sun as a power source, solar powered watches are a reliable way to tell the time. Because they don't rely on batteries, you never need to worry about your timepiece giving you anything other than a perfect reading. Our wide range of solar powered watches are built to the highest standards.


But as reader Lana Del Rey Globe pointed out, for folks that purchased the iPhone 6s and iPhone 6s Plus, or anyone with GarageBand on their device, you can create your own ringtones with "relative" ease without using iTunes or needing a computer. How to set any song as iPhone ringtone without using iTunes Step 1.
How to Add Ringtones to iPhone using iTunes [2019]


It may be related to websites for 'breast cancer' or some sort of medical related content. Net Nanny does have a 'Filter Category' option for image/ video searches that can be set to Block, so that these sites are not available. Q. I added a site to my 'blocked sites' list but can still load the page in my web browser, why? A.
Net Nanny® Parental Controls | Porn & Website Blocking
AD
get.netnanny.com
Report Ad
Most-Trusted Parental Control Software, Helping Millions of Parents Since 1996. The Best Parental Control Software & Website Blocker in the Palm of your Hand.


Phones Leer en español iPhone X: Absolutely everything you need to know. We've lived with the iPhone X and we've learned a lot. It's all right here.

News: 5 Apps That'll Make You Ditch Your Stock Photo Gallery

News: 5 Apps That'll Make You Ditch Your Stock Photo Gallery

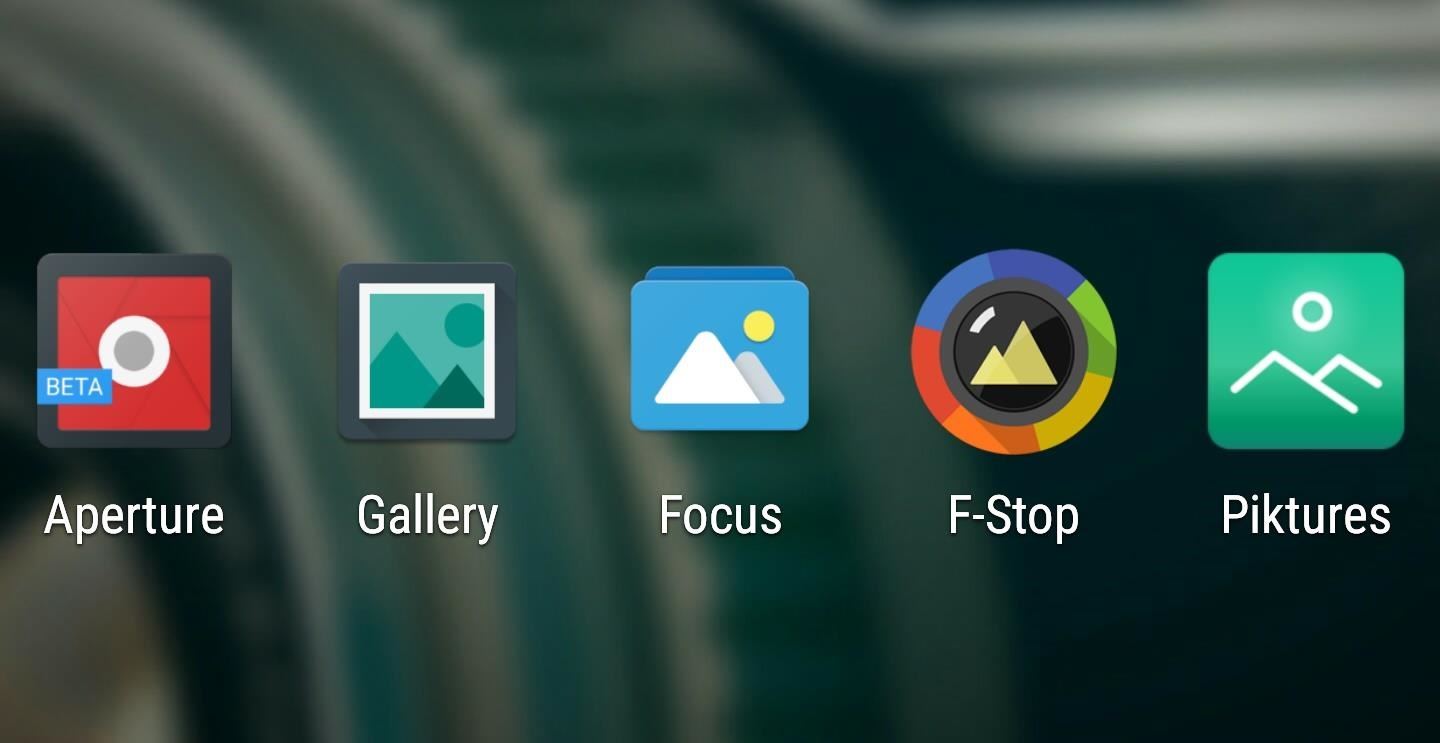
Making sure you have the best gallery app available for your Android device used to be as easy as just installing QuickPic. But late last year, Android's top photo-viewing app was sold to a company who is notorious for permission spamming, so QuickPic quickly lost everyone's approval.Don't Miss: The Best Free Camera Apps for Android Thankfully, you don't have to resort back to your stock photo gallery app as there are many old and new alternatives out there that can fill QuickPic's once-impressive shoes. All of them are vying for the top spot, but we'll sort them all out with an in-depth comparison below.

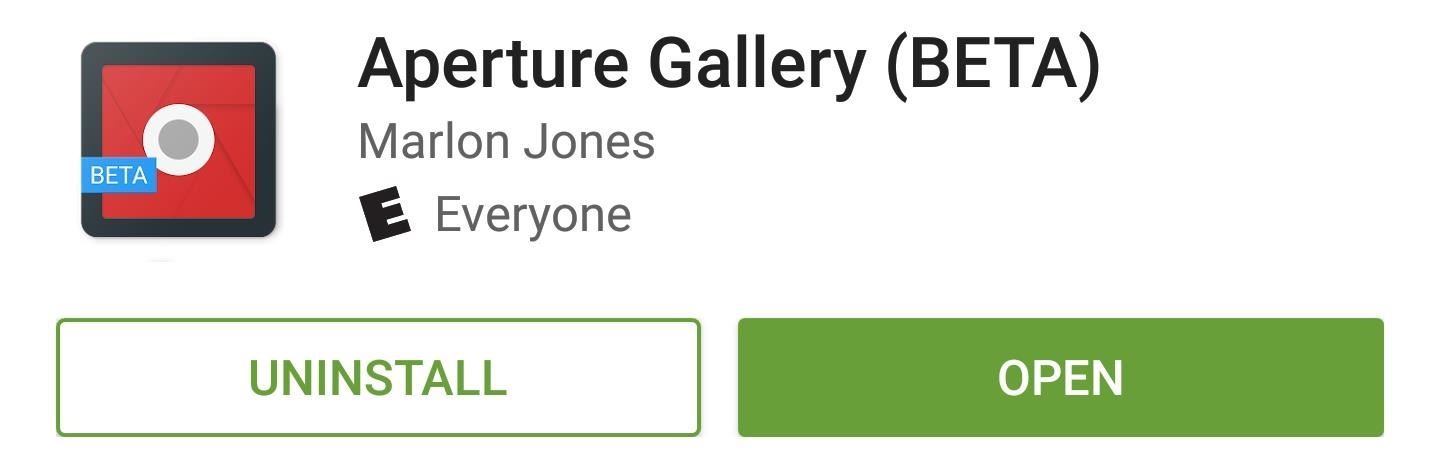
ApertureAperture was created specifically to fill the void left by QuickPic, and as a result of that newness, it's still in its beta phases of development at the moment. Nonetheless, the app is quite powerful and stable as it stands, and it's got quite a big user base already.Install Aperture Gallery for free from the Google Play Store Aperture's main interface utilizes Android's new Material Design language, complete with transition animations and subtle drop shadows. Beyond that, the photo-viewing experience is fairly standard, with folders that can be hidden on the main screen, a thumbnail grid within folders, and a full screen image viewer. If the salmon-colored interface isn't quite for you, a free theme picker lets you choose your own primary and secondary colors. In fact, there are plenty of customization options available here, which is amazing when you consider that Aperture is the smallest app in this list with an APK size of only 2.1 megabytes. Aperture Quick Facts:Total App Size: 2.1 MB Tagging Support: No Themes: Full theme support Folder Hiding: Yes (long-press existing folders to hide) GIF Support: Playback and zoom Photo Sphere Support: No Material Design: Yes Price to Unlock All Features: Free Unique Feature: Colored navigation bar (optional) Why Choose Aperture: Lightweight and fast

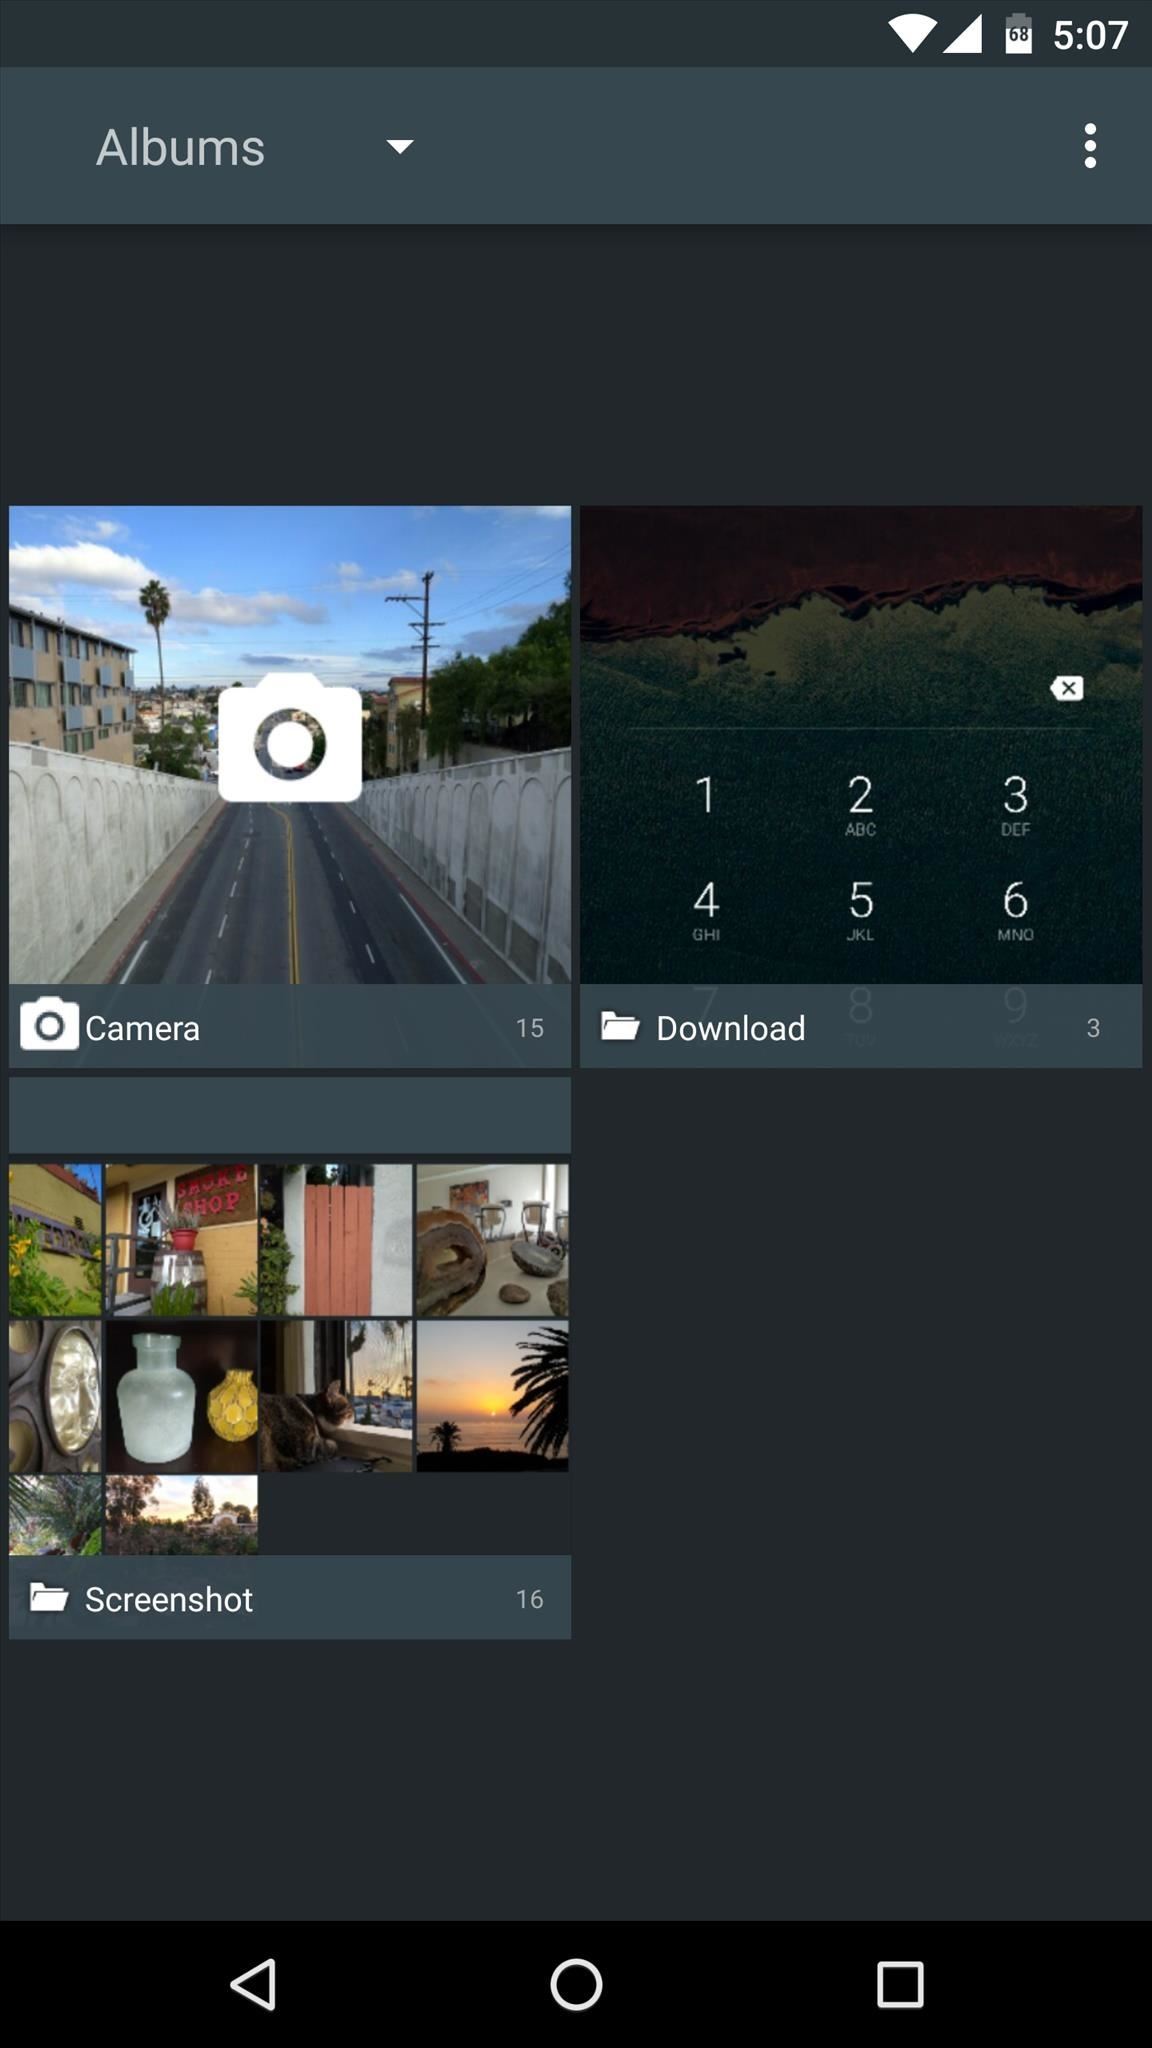
CyanogenMod GalleryHands down, CyanogenMod is the most popular Android custom ROM out there. For a good reason, too—its developers always manage to preserve the simplicity of stock Android while adding nice tweaks and useful features. The same can be said about the Gallery app on CyanogenMod, which has since been made available to all Android devices via sideloading.Download CyanogenMod Gallery for free from our full tutorial
The CyanogenMod Gallery app behaves exactly as you would expect when it comes to viewing photos—you'll find your camera roll and any local image folders right on the main screen. You'll be greeted by a grid of thumbnails upon opening a folder, and when you select a single image, handy controls give you quick access to Android's share menu and a basic photo editor. Beyond the basics, CyanogenMod Gallery doesn't have much customization to offer, because simplicity and speed are the main draws here. It's mostly a visually-updated version of the classic AOSP Gallery app, so you get some minor sorting options and an extremely intuitive interface. CyanogenMod Gallery Quick Facts:Total App Size: 5.3 MB Tagging Support: No Themes: No Folder Hiding: No GIF Support: Playback only Photo Sphere Support: No Material Design: No Price to Unlock All Features: Free Unique Feature: Based on standard AOSP Gallery Why Choose CM Gallery: Simplicity and familiarity

FocusSay what you want about developer Francisco Franco's personality, but the fact of the matter is he always puts out quality apps. As soon as QuickPic was sold off, he rushed in to bring his talents to the gallery app segment, and the product of this recent work is called Focus.Install Focus for free from the Google Play Store Focus uses full Material Design styling throughout its main interface, so you get nice transition animations in between screens. A set of 11 preset tags are available to help organize your library, though you'll need the pro version for custom tags. Beyond the basics, Focus packs a whole slew of additional features—but the majority of these require unlocking the pro version with an in-app purchase of $3.40. For instance, folder hiding, theming, and password-protected photos require the pro version, but all of the basics are included for free. Focus Quick Facts:Total App Size: 9.9 MB Tagging Support: Preset tags are free, custom tags require pro version Themes: Full theme support, but pro version required Folder Hiding: Pro version only GIF Support: Playback only Photo Sphere Support: No Material Design: Yes Price to Unlock All Features: $3.40 Unique Feature: Privacy mode (pro version only) Why Choose Focus: Preset tags and Material Design

F-StopF-Stop derives its name from a key concept in photography, so as you might expect, it's a great gallery app for the avid picture-takers out there. If you have lots of locally-stored photos and you've struggled to keep them organized, this app might be your best bet.Install F-Stop for free from the Google Play Store F-Stop's main interface features some burgeoning Material Design elements, including handy filter and sort icons embedded in the main action bar. When viewing an image, you can quickly share or delete the file, and the three-dot overflow menu has many useful options. On top of that, F-Stop is the only app in this list that lets you view Photo Sphere shots created with the Google Camera app. If you prefer your gallery app to be packed to the brim with features, F-Stop is clearly the way to go. The app offers so many settings that they have to be bundled into various submenus, and you can add your own custom tags to make photos easier to find. Another unique addition is a "Smart Folder" feature, which lets you add qualifiers such as a date range to automatically populate a single folder with certain types of pictures. F-Stop Quick Facts:Total App Size: 6.2 MB Tagging Support: Full custom tagging Themes: Full manual theming, but preset themes require pro version Folder Hiding: Yes GIF Support: Playback and zoom Photo Sphere Support: Yes Material Design: Partial Price to Unlock All Features: $3.99 Unique Feature: Smart folders Why Choose F-Stop: Robust set of features

PikturesWell before this whole QuickPic fiasco, an app called Piktures rose to prominence as one of the best gallery apps for Android. This continues to hold true today, as developer DIUNE has only had more time to add features and polish the Piktures interface.Install Piktures for free from the Google Play Store Piktures has perhaps the most visually-stunning interface of all apps in this list. A cover image adorns each folder entry in the side navigation panel, and this same photo has blur and parallax effects applied as it's shown at the top of the grid view. You can access filters by swiping in from the right edge of the screen, which is handy for sorting photos by location, for instance. But one of the most unique features is an ability to view locally-stored photos on your big screen through an optional Chromecast feature. Piktures Quick Facts:Total App Size: 8.4 MB Tagging Support: No Themes: No Folder Hiding: Yes GIF Support: Playback only Photo Sphere Support: No Material Design: Partial Price to Unlock All Features: Free Unique Feature: Chromecast support Why Choose Piktures: Gorgeous album views Which of these apps will you be using in lieu of QuickPic from now on? Let us know in the comment section below, or drop us a line on Android Hacks' Facebook or Twitter, or Gadget Hacks' Facebook, Google+, or Twitter.


Custom Status Bar, Nav Bar, and Quick Setting Icons on any Samsung Nougat Device. With the ability to use Substratum on Samsung devices (called Sungstratum) without it requiring root access, we
How to Control When the Alarm Icon Shows Up in the Status Bar


The Samsung Galaxy Tab 2 (7.0) 4G LTE on Verizon has only been released for a couple months now with good reviews. It comes with dual cameras, memory expansion, and very quick 4G LTE speeds, without needing a contract. Image via blogcdn.com While most users are satisfied with the tablet as is, there
How to Root and Unlock the Bootloader on a Samsung Galaxy Tab


The Moto G6 series isn't far away and most of the details regarding the device already appeared online. In our view its perfect time to have a complete roundup of rumors and leaks to know everything regarding Moto G6 and G6 Plus in detail. We are hopeful this roundup will help out our readers to know all details regarding the Moto G6 series
Here's everything we know about the Motorola Moto G7 Plus


Fortunately, Google Drive can be configured to run even without the Internet so that you can view and edit your documents no matter where you are. Here is how you can turn this feature on. Before you can view and make modifications to your Drive documents offline, you have to connect your computer to the Internet to install additional software.
How to set up and use Google Docs offline - CNET


Apr 01, 2019 · Apple even treats their limits this way. When you set a time limit on an app in Screen Time, your iPhone or iPad will let you use the app uninterrupted until you pass that limit.
What are your thoughts on phones with a display "notch"?


Clear Desktop Cache Using Disk Cleanup. Windows has had the Disk Cleanup Utility for ages now, and it still serves the purpose. To launch it, right-click the partition of your choice under Computer, and select Properties. From the dialog box, click Disk Cleanup and wait for the tool to load. Alternatively, you may enter "cleanmgr" in search
7 Ways To Free Up Hard Disk Space On Windows


The SanDisk Connect Wireless Stick is a flash drive designed to work seamlessly with iPhone, iPad, iPod touch, and Mac. Buy online now at apple.com.


Can't figure out how to install the Firesheep Mozilla Firefox extension? Take heart; this quick video guide presents a complete walkthrough of the download and installation process, teaching you everything you'll need to know to use Firesheep to hack your friends' Facebook and YouTube account information.
Firefox Mobile 101: Add New Functionality to Your Browser


For a photo- and video-sharing app based around privacy, Snapchat sure has a lot of security holes floating around. At one time, you were able to take screenshots of Snapchats in iOS 7 without the sender knowing, which is something that you can still do on rooted Android devices.
How To Tell if Someone Else is Using your Snapchat Account


Geolocation: Displaying User or Device Position on Maps Overview This tutorial shows you how to display the geographic location of a user or device on a Google map, using your browser's HTML5 Geolocation feature along with the Maps JavaScript API.
Add maps | Android Developers


This video tutorial will show you how to make the gantry linear slide bearings for a CNC router. You will see the slide bearings for the gantry, which are very long linear slide bearings. They are long for a good reason. First, the gantry is big. Second, the gantry is heavy. Third, the gantry is made of MDF. Fourth, the gantry is made by HAND!
How to Build a computer numerical control or CNC machine


Just a simple trick to score more points than the average guy out there. Literally no practical use. No cheat codes , No third party softwares used
How to Unlock the Hidden Flappy Bird Game in Android 9.0 Pie


This may not be news for a lot of people, but I just discovered that you can send text messages via email to most major cellular providers. This tip is stellar in that it is part stupid frugal trick (save money on texting from your cell phone by emailing for free), part productivity (you can probably type faster from a normal QWERTY keyboard than a phone), and part tech geek.
How to Send a Text from Email: 5 Steps (with Pictures


How to Change the Keyboard on Your Android Device let's begin with one of the first things I do when getting a new Android device --the keyboard. It's the fastest way for me to get a sense of
Android for beginners: Tips and tricks for your new smartphone

Tasker 101: How to Create an Exit Task

Tasker 101: How to Create an Exit Task
When you create a profile in Tasker, it will run a task as soon as all of the conditions in your profile are met. But what happens when the profile's conditions stop being met? By default, nothing will happen, but if you create an exit task, the automation tool will run that instead.Exit tasks are just like regular tasks, but they will only run when the rules you defined in your profile are no longer in effect. Think of it this way: If you tell Tasker to make your device run a task when you receive a phone call, you could also have it run an exit task when you hang up.Adding an exit task is a fairly simple process, but it's one that made Tasker finally "click" for me. So if you'd like to learn more about one of the most basic, yet most important features of Tasker, I'll show you how exit tasks work below.Don't Miss: 5 Useful Tasker Profiles to Help You Get Started with Android Automation
Step 1: Create Your Exit TaskI'm of the opinion that it's usually best to create your tasks before doing anything else in Tasker. Since tasks are what you want your phone to do, you probably have a rough outline of each step in your task already. Profiles, on the other hand, represent when (or why) you want Tasker to run your task, so they're somewhat secondary. Therefore, "task, then profile" is a logical order, particularly for beginners. The same can be said for exit tasks.Most exit tasks will essentially accomplish one thing: Putting everything back to normal. For instance, if your initial task turned Wi-Fi off when you left home, your exit task would turn it back on when you got back to the house.Aside from that, the actual process of creating an exit task is exactly the same as it was for creating your initial task. If you need to brush up on that, we've covered the entire undertaking with a separate guide, so check it out at the link below.Don't Miss: Tasker 101: How to Create a Task
Step 2: Create Your Profile & Attach Your First TaskOnce you've got your tasks in order, you'll need to create a profile that triggers them. Profiles, of course, are a set of conditions that must be met before your tasks will run. When creating a profile, you'll be prompted to associate a task with it — this is the primary task, not the exit task. In other words, the task that will run when your profile's conditions are true.So before you can add an exit task (i.e., the task that will run when your profile's conditions are false), you'll need to have a profile associated with your first task. If you need help on that front, make sure to hit up the following link.Don't Miss: Understanding the Different Types of Profiles in Tasker

Step 3: Add Your Exit TaskNow it's time to get down to business. From Tasker's Profiles tab, locate the profile you'd like to add an exit task to. If it only shows the name of the profile, tap the name to expand it and view more details.From here, long press the task portion of your profile (the text to the right). When you do that, a menu will appear — pick "Add Exit Task" here. At this point, you can choose the exit task you created in Step 1, or if you opted to skip that step, you can tap "New Task" to create the exit task at this point. But if your exit task already exists, simply select it from the popup menu. Now if you take a look at your full profile, you'll see how it all works. Beneath the title on the left, you'll see the name of your profile. If you tap this portion, it will show the conditions you set that will trigger your primary task.The primary task is shown beneath the title on the right with a green arrow next to it — this is what Tasker will do when your profile's conditions are being met. But when those conditions stop being met, your exit task will run, which is the task with a red arrow next to it. What are you using exit tasks to accomplish? Have you created any cool Tasker profiles that you'd like to share? Let us know in the comment section below.Don't Miss: How to Turn Your Tasker Profiles Into Apps That Anyone Can UseFollow Gadget Hacks on Facebook, Twitter, Google+, YouTube, and Instagram Follow WonderHowTo on Facebook, Twitter, Pinterest, and Google+
Cover image and screenshots by Dallas Thomas/Gadget Hacks

Tasker 101: How to Create an Exit Task - Gadget Hacks


Basically, I have created a profile to disable the lockscreen when at home (near my home wifi) but I would like to create an exit task. However, when I am located at my "profiles" screen and I long-click on the task that disables the lockscreen (a simple Keyguard Off task), I do not get the option "add exit task".
When do I need exit tasks? Example setup - Grokbase


When you create a profile in Tasker, it will run a task as soon as all of the conditions in your profile are met. But what happens when the profile's conditions stop being met? By default, nothing will happen, but if you create an exit task, the automation tool will run that instead. Exit tasks are
Beginner's guide to Tasker, part 1.5: Tasker basics (New UI)


name.tsk.xml - is the task file, which stores the task and actions. You can import this by selecting the task tab at the top and long clicking on it. You will only see files ending with .tsk.xml. Q: Tasker how to add exit task? A: Make sure you have the exit task ready. Go to the profile tab and long click on the entry task.
Totally new to Tasker: Help with how to create task for


Welcome to /r/Tasker. In addition to the Official Tasker Wiki, User Guide, and Google Groups, this subReddit is a place for fellow Redditors to discuss, share, and submit Profiles, Tasks & Walkthroughs for Tasker, or to ask for help creating your own Profiles, Tasks, and questions in general related to Tasker (including plugins etc).
Exit Task for TaskerDo I really need it? - Tasker


State contexts have two types of tasks, enter tasks and exit tasks. An enter task is the default, and runs when the profile becomes active. An exit task on the other hand runs when the profile is deactivated. It's important to understand that Tasker doesn't enforce anything you specify in the enter task while the profile is active.
How to set exit task on Tasker simplest way - YouTube


In this tutorial, learn the basics of how to use Tasker, an automation app for Android. With this one app, you can take Android to the next level! Adding an exit task. An exit task will tell


Kssxs I find I tend to create an exit task for anything I put in my entry task, only so that I'm absolutely sure I know the state of something when I've left the area in the original conditions that would have put it into that state to begin with. So, when I get home, the task does something, then when I leave, the exit task reverses it.
Tasker FAQ (Tasker how to) - Not Enough TECH


So I've decided to play around with this Tasker app and boy is there a learning curve! But I like a challenge like this. Anyway, quite possibly an easy question to answer for some of you familiar with the app, but do I really need an Exit Task?
How can I add exit task to "Phone ringing"? : tasker


Welcome to /r/Tasker. In addition to the Official Tasker Wiki, User Guide, and Google Groups, this subReddit is a place for fellow Redditors to discuss, share, and submit Profiles, Tasks & Walkthroughs for Tasker, or to ask for help creating your own Profiles, Tasks, and questions in general related to Tasker (including plugins etc).
How to use Tasker for Android - automate all things


How to set exit task simplest way. How to set exit task simplest way. Skip navigation Sign in. Advanced Use of Tasker -- Make Your Phone Work for You - Duration: 8:48. xdadevelopers 183,174 views.
How to do an exit task - Tasker | Android Forums

Siri 101: How to Make Siri Correctly Recognize & Pronounce Contact Names on Your iPhone

Siri 101: How to Make Siri Correctly Recognize & Pronounce Contact Names on Your iPhone
Siri makes it easy to call almost any contact on your iPhone with just a quick verbal command. I say almost because counterintuitive name pronunciations such as Caoimhe, which is actually pronounced "Keeva," will confuse the hell out of Siri. Luckily, there's a way to get Siri to understand pronunciations for the tricky names in your contact list ... it just takes a little grunt work on your part.There are actually a couple different ways to get Siri to understand problematic names correctly. One way is through Siri itself, and the other way is done manually through the Contacts app. The Siri method can be slightly tricky, so I'll show you how to do both below. I'll be using the first name Caoimhe (pronounced "Keeva") as an example, so just swap it out with the name you want to fix.

Telling Siri How to Understand PronunciationsEver since iOS 7, Siri has had a nice little feature baked in that helps you teach her how to understand and pronounce difficult names.To sum it up quickly, you just have to ask Siri to text the questionable contact, then after a few failed tries, she'll ask you choose the contact manually, then will ask how to pronounce the name. I haven't been able to get this to work when calling or emailing anyone, only texting, so keep that in mind.Ask Siri to "text Keeva." Siri will respond with "I couldn't find 'Kiva' in your contacts. To whom shall I send it?" Enunciate "Keeva." Siri will respond in the same way, only this time there will be an "Other" button on the screen. Tap "Other" then choose Caoimhe from your contact list. (You may need to unlock your iPhone first.) Don't Miss: How to Type Questions & Commands to Siri Without Any TalkingProceed to fill out and send the text message using Siri. After the text message is sent, Siri will respond with "By the way, sorry I didn't recognize that name. Can you teach me how to say it?" Say "yes," and Siri will respond with "OK, how do you pronounce the name (Caoimhe)?" Say "Keeva" again. Siri will respond with "OK, thank you. Which pronunciation should I use?" and will give you a few options to play and choose from. Tap "Select" next to the best option, or tap "Tell Siri again" if none of them sound right, and repeat the process until one works. (If a last name is attached to the contact, you'll have to "teach" Siri how to pronounce it as well.)When done, Siri will respond with "OK, I'll remember how you say 'Caoimhe' from now on.

Manually Entering Correct PronunciationsAs mentioned before, the Siri technique above only works when texting the name in question. Also, Siri can be fairly buggy during the process. So, to avoid those frustrations, you can manually enter the correct pronunciations for tricky names right in the Contacts app.Open up the Contacts app or navigate to the "Contacts" tab from the Phone app. Select the contact, in this case, Caoimhe. Hit the "Edit" button in the top right. Scroll down the page, then tap on "add field" at the bottom. Select "Pronunciation first name" from the list. Scroll back up to the top, then fill in "Keeva" in the new Pronunciation first name field. Tap on "Done" when finished, and Siri will now understand you the next time you say "Keeva" but want Caoimhe. Don't Miss: More Helpful Guides for Using Siri on Your iPhoneFollow Gadget Hacks on Facebook, Twitter, Google+, YouTube, and Instagram Follow WonderHowTo on Facebook, Twitter, Pinterest, and Google+
Cover photo and screenshots by Justin Meyers/Gadget Hacks


Thanks to a new feature in iOS 7, you can now tell Siri how to pronounce contact names correctly. Siri will listen to the way you pronounce a name, then give you a few pronunciation options based
Teach Siri to Correctly Recognize and Pronounce Names in Your


Siri isn't the brightest bulb in the box and she often misunderstands unusual words and names. Fortunately, you can teach her how to speak properly by adding phonetic pronunciations to your contacts.
4 ways to make Siri smarter on your iPhone - CNET


Siri leaves a lot to be desired in your iPhone whenever you come across a contact name that isn't your average 'Joe'. Some names don't carry the same phonetic pronunciation to them when written in English. Luckily, Apple had planned for such occasions, and users can get Siri to correctly pronounce and recognize a contact's name.
How to Make Siri Pronounce Contact Names Correctly in iOS 7


Siri makes it easy to call almost any contact on your iPhone with just a quick verbal command. I say almost because counterintuitive name pronunciations such as Caoimhe, which is actually pronounced "Keeva," will confuse the hell out of Siri. Luckily, there's a way to get Siri to understand
How To Make Siri Recognize Difficult To Pronounce Contact


Siri 101: How to Make Siri Correctly Recognize & Pronounce Contact Names on Your iPhone How To: Master Siri's New Voice Commands in iOS 7 & Make Her Do Whatever You Want How To: Change Siri's Accent on Your iPhone to Australian, British, Irish, or South African
How to Make Siri Say Your Name Correctly | iPhoneLife.com

Siri 101: How to Make Siri Correctly Recognize & Pronounce


Siri isn't the brightest bulb in the box and she often misunderstands unusual words and names. Fortunately, you can teach her how to speak properly by adding phonetic pronunciations to your contacts.
Teach Siri How To Pronounce Contact Names Correctly In iOS 7


4 ways to make Siri smarter on your iPhone. the setup process again of training Siri to recognize your voice. however, teach Siri how to correctly pronounce names in your Contacts.
How to Pronounce Apple Siri iPhone Voice Directions Questions


Reader Regina Laurent wishes to correct Siri's pronunciation. She writes: I like using Siri on my iPhone but she mispronounces my name as well as the names of some of my French friends.


Siri will then ask you how to pronounce the contact's first name. Say the name correctly. Siri will offer you four pronunciation options to choose from. Select the one that is the correct Siri pronunciation. If none of the options are close enough, tap Tell Siri, "Again," to repeat the process until you get a Siri pronunciation you like.
Teach Siri to Correctly Recognize and Pronounce Names in Your


Learn the proper way to say and pronounce the name Apple Siri in English. Apple Siri iPhone Voice Directions Questions Help. Pronounce and say English words correctly. English and American
How to correct Siri's pronunciation | Macworld

How To: Boost the Stock Volume Levels on Your Nexus 7 for Louder Sounds All Around

How To: Boost the Stock Volume Levels on Your Nexus 7 for Louder Sounds All Around
The volume is maxed out, but that doesn't stop me from hitting the volume key on my Nexus 7 in hopes that it will magically get louder. This happens to me everyday as I watch videos or play music. The simple fact is that a Nexus 7 tablet just doesn't get very loud. At least, not loud enough for me.While you could attempt to use various equalizers or other third-party apps that claim to be volume boosters, today I'll be showing you how to settle this once and for all by adjusting your Nexus 7's volume at the system level, which noticeably increases the overall volume for the device.
PrerequisitesThis mod is only for the Nexus 2013 model. Do not attempt to flash these on a 2012 model, or at least create a backup if you're feeling adventurous.To perform this mod, you will need full access to your tablet's system, which means you need to be rooted. If you haven't done so already, check out our always-updated rooting guide to get that process taken care of.After rooting your device, you will need to install a custom recovery on your Nexus so you can successfully flash the mod. Take a look at our TWRP guide to get that started.
Step 1: Download Your Volume Level ModThanks to the efforts of developer Robert Shreve, you have three viable options for boosting the volume on your Nexus 7 beyond its stock level of 84 (and one option as a precaution to revert back to stock levels):Volume Level 90 (alternate link via jordi.id96) Volume Level 95 (alternate link via jordi.id96) Volume Level 98 (alternate link via jordi.id96) Stock Volume Level (84) Personally, 95 is the perfect level; it has the capacity to get really loud, but not too distorted, like 98. Volume level 90 isn't too much of an upgrade, but you can always download them all, test them out, and settle on the one that sounds best to you.
Step 2: Enter TWRPWith the ZIP files tucked away in your Download folder, enter your custom recovery to begin flashing—you can do this by powering down your device, then powering it back on by holding the Power and Volume Down buttons at the same time.

Step 3: Flash the Volume FileOnce in TWRP, select "Install," locate the "Download" folder, and select the Volume ZIP file you chose to use in the previous step. Then just swipe to flash it.
Step 4: Enjoy Higher VolumeAfter your Nexus boots back up, test the volume levels by playing some music or a video. All of the volumes on your device will be higher, including system sounds, media, and headphone levels.Check out some other awesome ways you can improve the music listening experience on your Nexus, and let us know what you think of this hack, and which volume level you went with, in the comment section below.
Cover image via Shutterstock


Nokia 9 PureView Hands-On: A cutting-edge Nokia flagship headed to The States! The Google Pixel 3a and Pixel 3a XL are an off-shoot of the company's flagship


Cookies. Refer to the Browsing History guide above. Under Step 3, set "Time range to clear" to 'Everything' and "Details" to 'Cookies.' Then complete Step 4. Automatically Clear Cache, Browsing History, and Cookies. For those wanting to clear their Firefox history each time they end a browsing session, here's how you can do it:
How to delete cookie files in Internet Explorer


The easiest way to check past data usage is to log into the web portal of your cellular provider (or check your paper bills) and look at what your data usage is. If you're routinely coming in way under your data cap, you may wish to contact your provider and see if you can switch to a less expensive data plan.
How to Reduce Your Data Usage on Android or iPhone | Digital

Preserve Battery Life on Android in Just One Tap « Samsung


When the photos populates Photo Gallery, put a check on the photos by clicking it once. Alternatively, clicking Ctrl+A on your keyboard will choose all Photos/Videos in your Photo Gallery; Right click on a picture and choose Copy. Go to your computer and choose your SD card. Paste the photos by right clicking on the SD card and choose Paste.
How to Move Pictures from Gallery to SD Card in Android
innov8tiv.com/how-to-move-pictures-from-gallery-to-sd-card-in-android-galaxy-s5-or-any-other-phone/
SD card is the best place to save your photos. Once you move pictures from gallery to SD card, you can easily transfer them, travel with them and share them with others. In Samsung Galaxy S5 or any other Android phone, you can move pictures to SD card very easily.
How do you upload pictures from memory card to facebook?


Small Tactical Flashlights Military Grade with Holster Holder Waterproof IPX8 Outdoor Super Bright Led Flashlight High Lumens 18650 CR123A EDC Pocket Police Mini Torch Camping Lantern Tac Light Gear 4.3 out of 5 stars 9
Turn Your Phone's Flashlight on Instantly with One of These 6


The Gauss Rifle: A Magnetic Linear Accelerator This very simple toy uses a magnetic chain reaction to launch a steel marble at a target at high speed. The toy is very simple to build, going together in minutes, and is very simple to understand and explain, and yet fascinating to watch and to use.
The Gauss Rifle: A magnetic linear accelerator


Earlier this month, Adam Cudworth, 19, launched a camera attached to a weather balloon into the edge of space. Battling tough winds, freezing temperatures, atmospheric pressure and tumbling speeds, the teenager from Worcestershire, England was able to capture these amazing pictures of the Earth's upper stratosphere.
Explore 10 incredible open-world games | PCWorld


You can tick the box next to Mute volume key "beep" if you don't want to hear the indicator sound each time you adjust the volume level. Step 3: Using the Volume Slider The volume slider will automatically appear as an overlay on top of your status bar when you press one of your Nexus 5's hardware volume keys.
YouTube iOS App Removes Apple's Obtrusive Volume Indicator in


Voice Recorder for the iPhone and iPad - download now for FREE! UNLIMITED RECORDINGS Record for as long as you want and as many times as you want. (No restrictions as long as you have enough available storage on your device). TRANSCRIBE RECORDINGS (In-App purchase) Transcribe recordings into text using speech-to-text technology 3D TOUCH
The Best Voice Recording App for iPhone - lifehacker.com


How to turn off emoticons in Skype for Windows 10? In every previous version of Skype, there has been an option to turn off emoticons. A lot of people like to type their own faces and emotes into chat and we do not want them being auto-converted into emoticons, especially when the 'translation' is wrong.


Phosphors are great for lighting up areas where fire will not burn, and also for keeping humans alive in very small quantities. Quenching phosphors allows you to use them for all sorts of cool projects, and this video will show you how to make an IR detection device with quenched phosphors and also how to measure temperature with thermally quenched phosphors.
IR detection via "quenching" | Make: - Make: DIY Projects and


Amazon Video. Amazon Video is another excellent service to watch movies offline without Internet on iPhone XS Max. All you'll need is a subscription to Amazon Video, or have it bundled in as part of your Amazon Prime subscription.

How To: Enable Stereo Sound on Your Nexus 5

How To: Enable Stereo Sound on Your Nexus 5
At $349 off contract, the Nexus 5 has always been one of the best bang-for-your-buck smartphones on the market. In order to keep the price that low, however, Google had to pass up on some of the minor features that other flagship phones offer.Stereo sound, for instance, is becoming a staple in many top-of-the-line phones. The Nexus 5 simply does not support this feature out of the box, with its single speaker hardware making that functionality nearly impossible. Nearly.Developer Sasha Shafranko has found a rather inventive way around this limitation. By routing audio through the front-facing earpiece on your Nexus 5 in addition to the existing bottom speaker, you can now enjoy true stereo sound with all of your music and media. Please enable JavaScript to watch this video.
RequirementsRooted Nexus 5 Custom recovery installed

Step 1: Download the Stereo Sound ModShafranko's stereo sound mod comes in the form of a flashable ZIP file. To download this file, point your Nexus 5's web browser to this link, then wait until the download has finished before proceeding to the next step.

Step 2: Boot into Custom RecoveryNext, power your phone completely off. When the screen goes black, press and hold the volume down and power buttons simultaneously. This will bring up Android's bootloader menu—from here, tap the volume down button twice to highlight "Recovery mode," then press the power button to select it. For an easier way to boot into custom recovery, check out my guide on adding a full reboot menu to Lollipop.

Step 3: Install the Stereo Sound ModFrom TWRP's main menu, tap the "Install" button to begin (this may be slightly different if you're using ClockworkMod, but the general process is very similar). From here, navigate to your device's Download folder and select the "Surround Sound(fixed).zip" file. After that, simply swipe the slider at the bottom of the screen to install the mod. When the process is finished, tap "Reboot System." When you get back up, sound will be played through your front-facing earpiece and the bottom-firing speaker simultaneously. This goes for all media, so crank up the volume and enjoy the show.If you'd like to disable this functionality, a revert ZIP is available here. Just flash the file in custom recovery using the same method depicted above.I'm loving the improved sound quality that this little mod brings, how about you? Let us know in the comment section below, or drop us a line on our Twitter or Facebook feeds.


Seven different statistical tests and a process by which you can decide which to use. The tests are: Test for a mean, test for a proportion, difference of proportions, difference of two means
How to Choose a Cell Phone | Buying Guide and Tips | Digital


The Note 9 not only scored far below last year's Apple flagship iPhone X (10,357 points) but also fell short of OnePlus 6's benchmarked score of 9,088 points.
Music Video - Strand of Oaks « Canon EOS 7D :: WonderHowTo


CNET's Dan Graziano shares with you tips and tricks for Google's latest flagship smartphone. Get the most out of your Nexus 5 CNET. Loading Unsubscribe from CNET?
Nexus 6: Common Problems and How to Fix Them | Digital Trends

How to Restart iPhone / iPad Without Using Power Button
osxdaily.com/2014/08/07/restart-ios-without-hardware-buttons/
We'll cover two quick and easy methods to reboot any iPhone, iPad, or iPod touch - without having to use the hardware buttons at all. These methods rely on toggling software settings that initiate a soft reboot to the device, which means even if your physical buttons are completely malfunctioning, you can still restart a device if it's necessary to.
How to Restart Your iPhone in iOS 11 Without Using the Power


How To: Swap the Back & Recents Keys on Your Samsung Galaxy S6 How To: Remove the S Finder & Quick Connect Buttons from Your Galaxy S6's Notification Panel How To: Prevent Bricks by Backing Up the EFS Partition on Your Samsung Galaxy S6
[Q] Damaged EFS, no backup - how to repair S… | Samsung


News: The Latest Razer Phone 2 Leaks Suggest Project Linda Might Actually Happen By Jon Knight; Android; After the first image leaked of the upcoming successor to the Razer Phone, many were taken aback by its design, specifically how familiar it was.
How to Get Free Internet on Your Laptop from Your Phone


Emulators are a way to play your favorite childhood games on your iPhone, iPod touch, or iPad without carrying the game disks or cartridges and game consoles around with you. Instead, they sideload the games on your device as a piece of software, and they're given controls that are adapted for the touch screen.

How to Protect a touchscreen device against rain (cheaply


Hangouts, and most other texting apps, use the "Bitmap.createScaledBitmap" API to produce a compatible picture MMS, but that just gives a crappy, low-quality version of the original image. Developer Kevin Mark decided to do something about the compression of MMS images and created an Xposed module to change the API used during image compression.
How to Preview New Google Hangout Messages from the Home


Here's what you need to know about Microsoft's Chromium based Edge browser you can download the new Edge Insider browser from this page. You don't need to be a Windows Insider to start
How to Reinstall Microsoft Edge Browser on Windows 10 Quickly


We've described easy ways to free up space on your iPhone or iPad but that may not be enough for those who store a lot of data on their iOS devices. It's why we recommend that you pay a little
How to Free Up Space on iPhone (& Never Worry About - YouTube


How To: Theme KitKat to Look Like Android L on Your Nexus 5 How To: Get Digital Wellbeing in Android 9.0 Pie on Your Pixel Right Now How To: Root Your Google Pixel or Pixel XL News: Night Mode Is Coming to Android!
How To Make Your Android Phone Look Like Android L - YouTube


How To: Download device drivers and Froyo 2.2 ROM when rooting a Motorola Droid How To: Flash the SBF file with RSD Lite when rooting a Motorola Droid cell phone How To: Easily access Google Maps from the Motorola DROID How To: Use Verizon Wireless's new Motorola Droid X cell phone
How to Root Moto X and Motorola Android Devices


Download a map. Save new maps to your phone before a journey, so you can browse the maps without an internet connection when traveling. Tap Maps > menu > Offline areas > select your own map. Select the area on the map and tap DOWNLOAD.
Nokia OVI maps - delete maps from the phone offline