How To: Install the Xposed Framework on Your Samsung Galaxy S4 for Quick & Easy softModding
Xposed, by XDA developer rovo89, is a framework for your Samsung Galaxy S4 (or other Android device) that lets you add tweaks and customizations to your ROM (either stock or custom) without any real hassle.This pretty much means that your GS4 can have the features of a custom ROM without ever having to install one—and you get to pick and choose which softMods you want to add to your system.
Before Proceeding: Root!You will need a rooted phone for this tutorial. If you have the AT&T GS4 with MF3 firmware, you can check out my full rooting guide for help. If you have another version, you can try one of our other softModder guides to rooting the GS4 for instructions. Please enable JavaScript to watch this video.
Step 1: Back Up Your DataAs a precaution, you should create a full nandroid backup using your recovery (either ClockworkMod or TWRP). If you don't have a custom recovery, you should back up as much stuff as you can. The very popular Titanium Backup gets the job done in backing up all your apps and system data.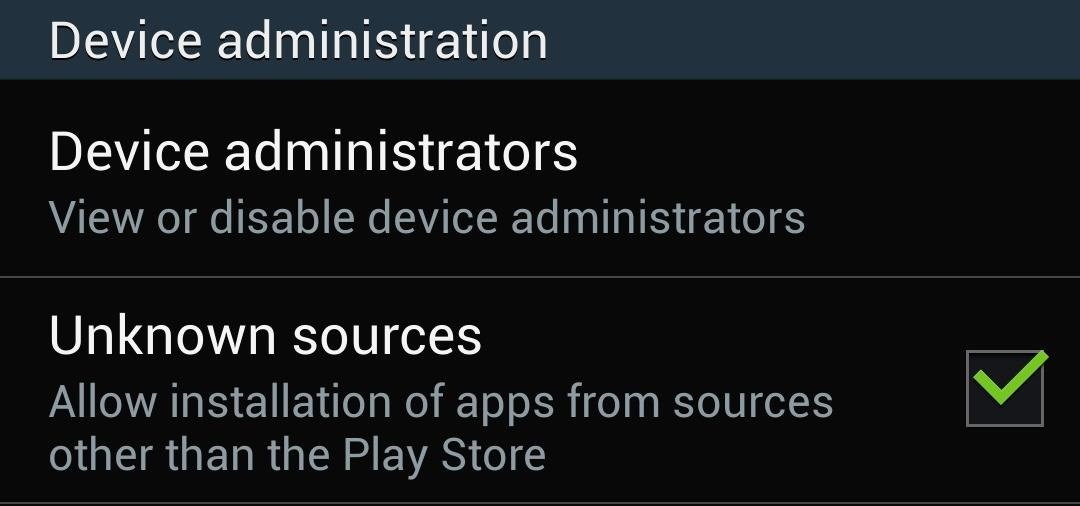
Step 2: Enable Unknown SourcesYou might have done this already through previous softModder guides, but if you haven't already, its quite simple. Just tap on your GS4's menu button, go to Settings -> More -> Security, and under Device administration, make sure Unknown sources is checked. This will allow us to install apps from outside the Google Play Store.
Step 3: Download the Xposed FrameworkYou can grab the latest version here of the Xposed Framework right here. Download directly onto your device.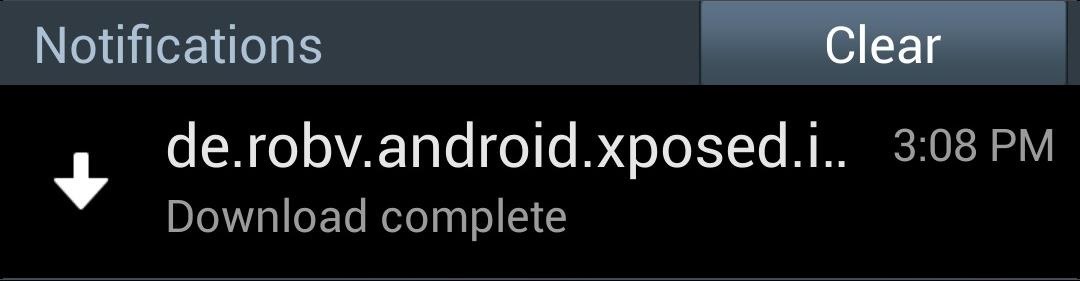
Step 4: Install the Xposed InstallerOnce you finish downloading the .apk file above, the Download complete alert will pop up in your Notification tray. The .apk file gets updated every so often, so the file name that you have might vary, but it will look something like this: de.robv.android.xposed.installer_v#.apk. Open it up and select Install at the bottom. Tap Open once the install finishes.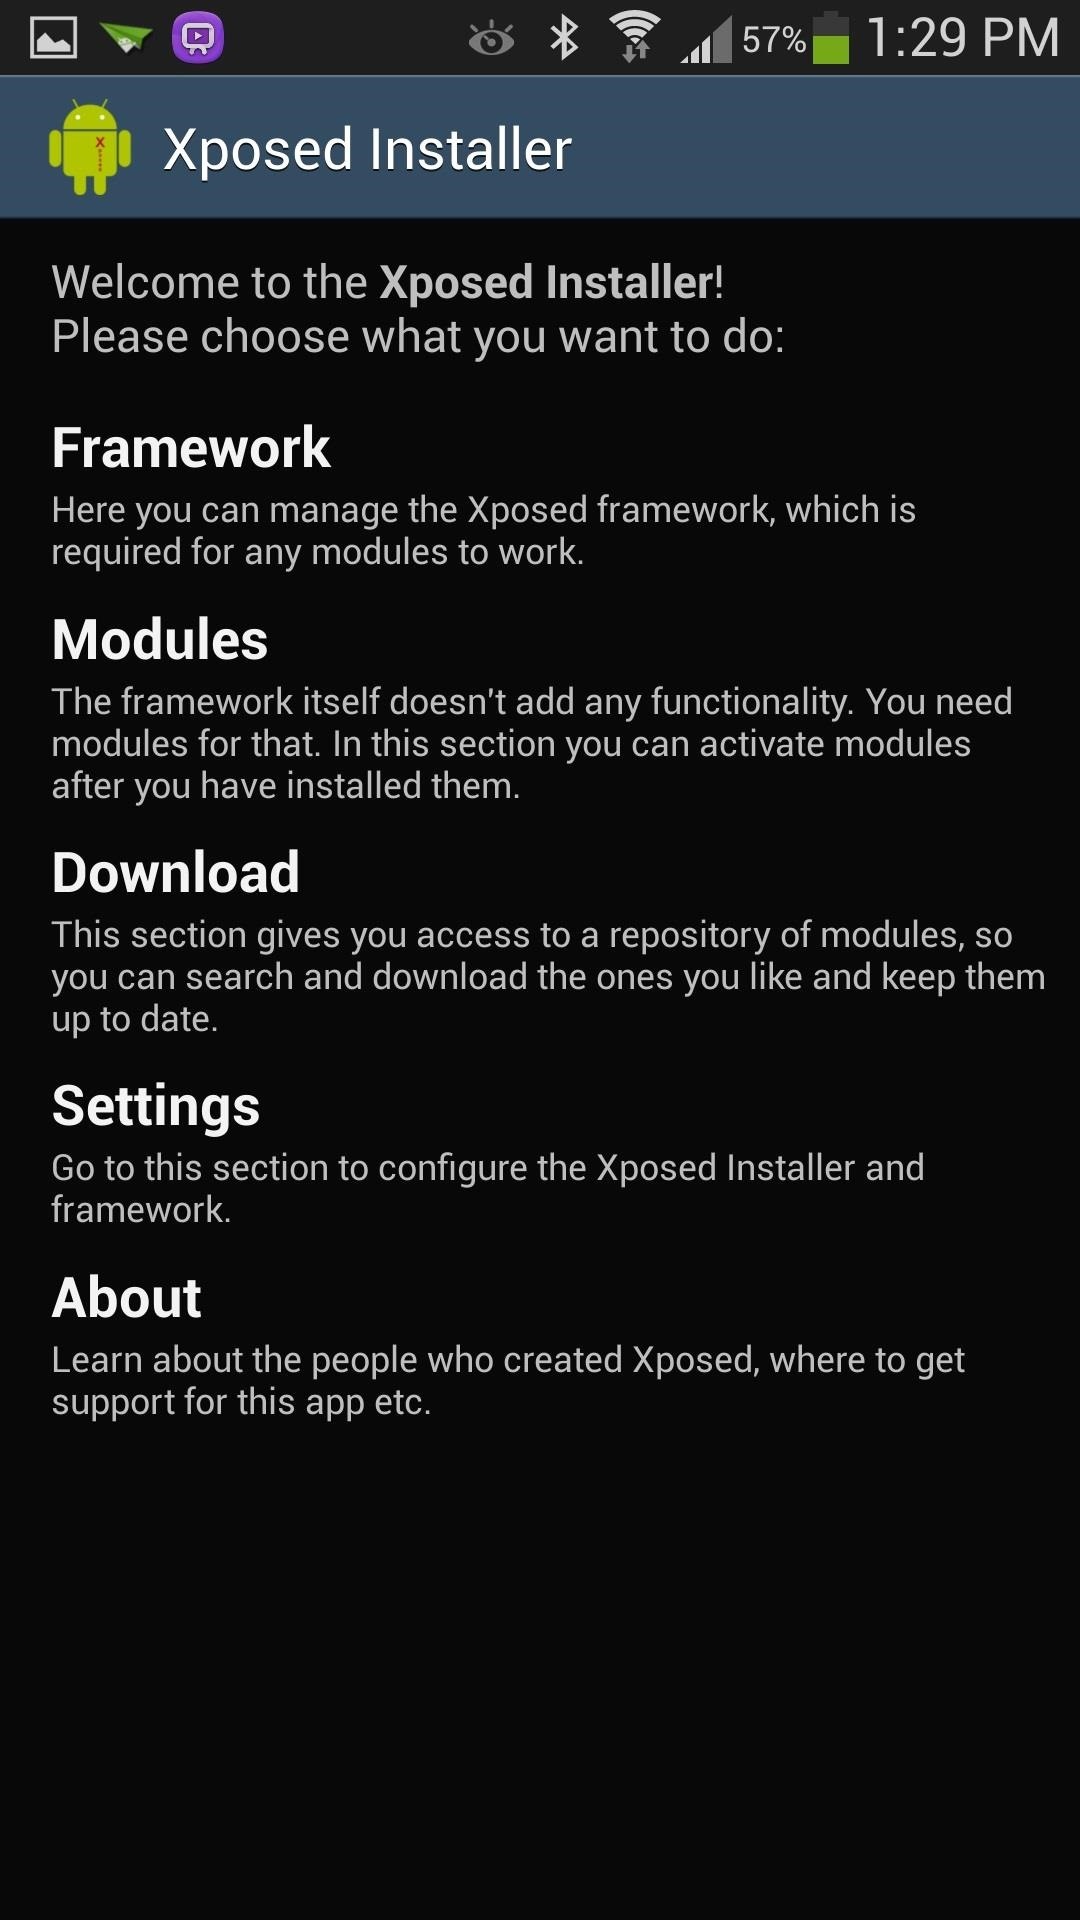
Step 5: Run the Xposed InstallerNow, you haven't actually installed the Xposed Framework quite yet; just the installer. Hopefully I don't confuse you here, but it's like downloading a software program's installer file (like an .exe) onto Windows, then running the .exe to actually install the program.So in order to do so, tap on Framework, then Install/Update. A Superuser request should pop up; go ahead and select Grant.
TipIf you ever need to uninstall Xposed, you would use the Uninstall, then Clean up buttons.
Step 6: Reboot Your GS4You'll need to reboot in order for the Xposed Framework to start working. You also need to do so every time you install an Xposed module or update Xposed.
Xposed Is Installed...Now What?The Xposed Framework itself doesn't actually do anything. What it does it provide a backbone for you to add modules, which do the actual modifications.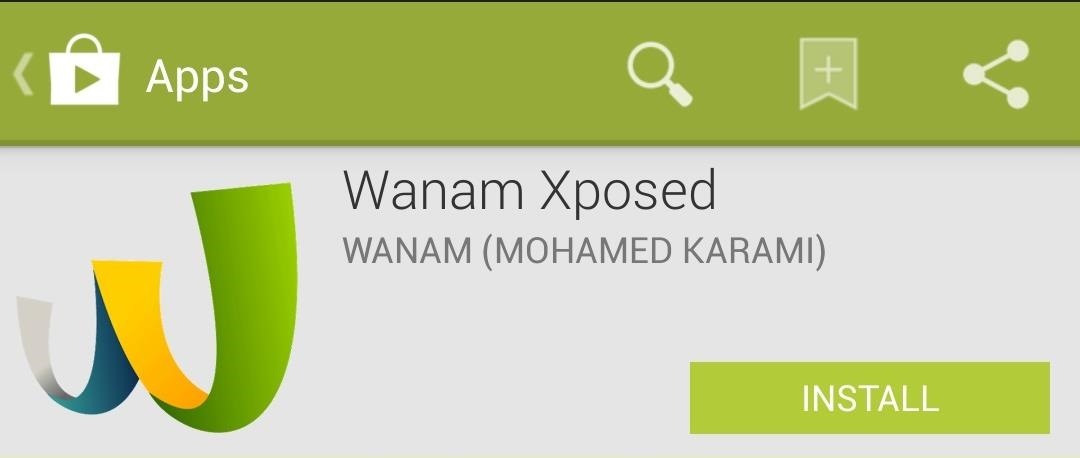
Step 1: Picking ModulesA good "starter pack" module to have for your GS4 is Wanam Xposed. It's developed by Mohamed Karami, and available for free on the Google Play Store. Check out its description in the Play Store for a list of customizations it offers. That list is huge! Just a few of my favorites:Flashlight through volume button UP Skip music with Volume buttons Transparent Notifications panel Another good "starter pack" (for AT&T devices only) is Nottach Xposed. You can find a full guide on Nottach right here by fellow softModder Faisal.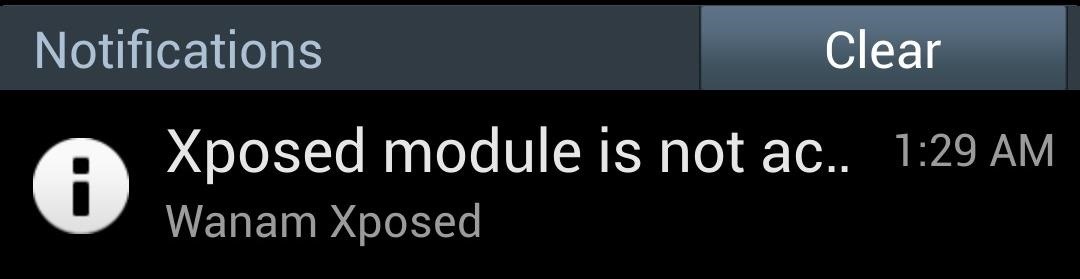
Step 2: Installing ModulesOnce you install one of the above modules, you'll have to do a few things to activate it. Whenever Xposed Framework detects a module being installed, it gives a notification telling you that the module is not active yet. You can tap on the notification and it'll take you to Xposed's Modules page. If you miss or accidentally cleared the notification, simply head to Xposed's main screen and tap on Modules. Then check the box next to Wanam Xposed (or whichever module you want to activate). You'll need to reboot.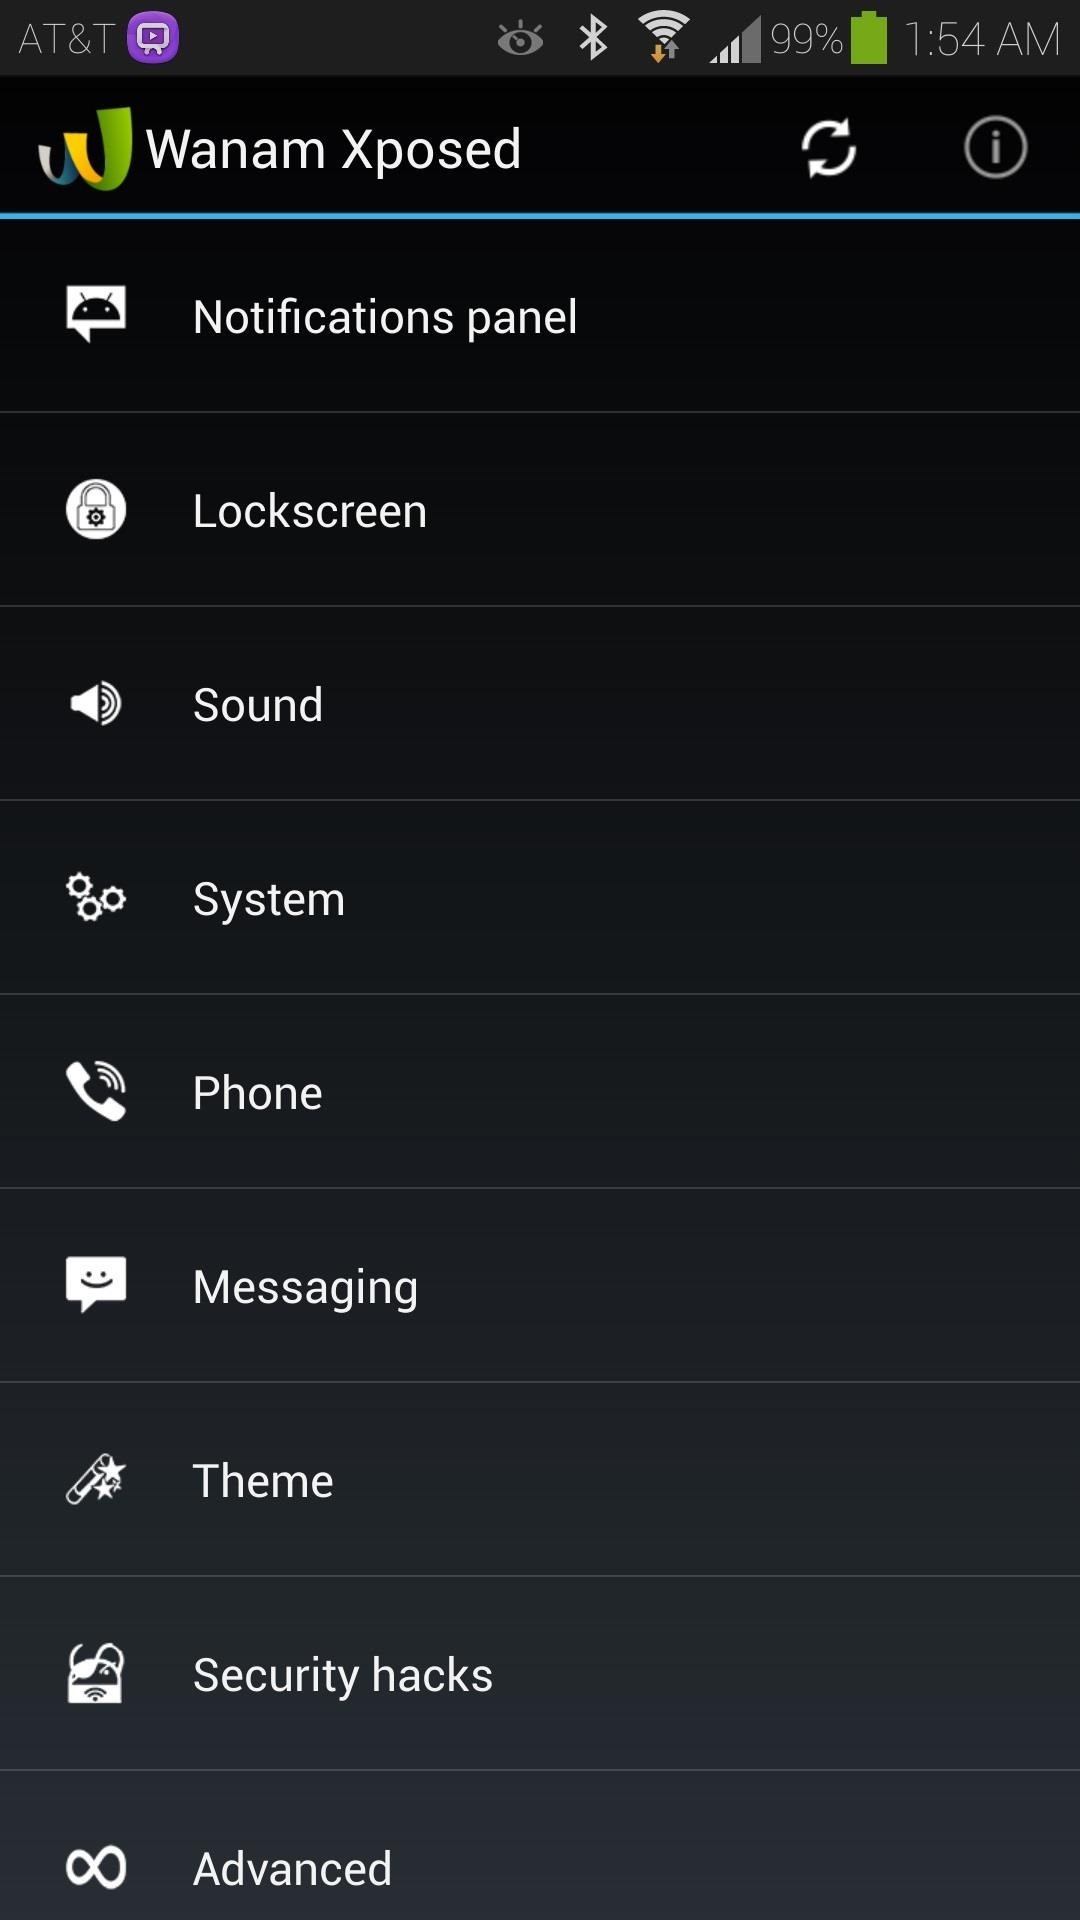
Step 3: Test Out Your New ModsTo try out Wanam's customizations, simply tap on it from Xposed's Module page, or open it up from your app drawer. They're split up into various categories. Every time you make a change, a reboot is required for the changes to take effect. Wanam has a built-in reboot menu, which you can bring up by tapping the circular arrows icon near the top right corner. There are dozens of other Xposed modules for you to try out. Check out this XDA thread full of them. For our GS4, stick to section A. Modules for all ROMs and B. Modules for TouchWiz ROMs.I'll be showcasing some of the really great ones in upcoming GS4 tutorials, so stay tuned! If you have any questions, comments, or module recommendations, feel free to post in the discussion section below.
How To: Automatically Hibernate Apps for Better Battery Life—No Root Required How To: Preserve Battery Life on Android in Just One Tap How To: Preserve Battery Life on Your Jelly Bean-Powered Samsung Galaxy S III How To: Fix Delayed Notifications on Your Galaxy S8 or S8+
10 tips to improve Android battery life - TechRepublic
Removing bloatware usually requires you to take extreme measures like rooting. Unfortunately, the Galaxy S10 falls under this annoying umbrella, but there's an easy workaround. Package disablers designed for Samsung phones are all over the Google Play Store, and they do a good job of helping you remove bloatware without root.
How to Safely Disable All Bloatware on Galaxy S9
Tips for Taking Your Twitter Game to the Next Level Also keep in mind that this is not Instagram, and users don't want to read every other word in hashtag form
News: 5 Secret Snapchat Lenses That Will Make Your Weekend — Infinity War, the Chainsmokers & More News: Try These 5 Hot New Snapchat Lenses — The Zucc, PUBG Helmet & More News: Snapchat Summons Dragons from Westeros to New York for Game of Thrones AR Promo News: World of Warcraft Lens on Snapchat Lets You Transform into Orc or Elf & Do
5 Snapchat Lenses You Have to Try Out This Week — Post Malone
This does not allow further layer-based editing. In Photoshop, when your edits are all accomplished, you convert the PSD file into JPEG or BMP or whatever format is most suitable for the medium where you want to actually use the image, like a website or a print publication. Here are five ways to open a PSD file without Photoshop. Paint.net
How To Get Photoshop For FREE! (LEGALLY) Download Photoshop
Guide with photos, descriptions and impressions on how to disassemble and repair laptops, printers, mobile phones, Smartphones and more. The disassembler assumes no responsibility for any damage that you may cause to your equipment using the site guides. Everything you see is only a guide and help.
Nokia N8 Teardown - iFixit
To switch between internal storage and the external memory card on a dual storage device like the Samsung Galaxy S4, please tap on the icon in the upper left to slide out the Menu. You can also tap and drag-right to slide the menu out. Then tap on "Settings".
how to change storage to sd card on samsung tablet - YouTube
How To: Remove Any Status Bar Icon on Your Galaxy S8, S9, or Note 8 How To: Remove Any Status Bar Icon on Your Galaxy S10 — No Root Needed How To: Get Rid of the Annoying Input Notification & Keyboard Icon on Your Samsung Galaxy S4
How to Hide Icons in Android's Status Bar
Open a web browser on your paired iPhone and go to Developer.apple.com. Step #2. Now, check out the watchOS 6 download page and hit Download watchOS 5.2 beta Configuration Profile. Step #3. Next, choose Apple Watch as the device for beta testing and hit Install. Step #4. Next up, you have to enter your Apple ID passcode.
How to download watchOS 5.3 beta 2 to your Apple Watch
The simple trick that frees up space on your iPhone without having to delete photos, music or apps A Reddit user has discovered an easy way to free up space on the handsets and tablets without
One Weird Trick to Free Up Storage Space on iPhone! - YouTube
Apple today seeded the second beta of an upcoming iOS 10.2.1 update to public beta testers for testing purposes, one week after releasing the first iOS 10.2.1 public beta and one day after
Apple releases iOS 12.3 beta 3 to public beta testers - Geeky
This is not an official TWRP Recovery on Essential Phone PH-1 from TWRP Team. If you install any Custom Recovery on Essential Phone PH-1, you can install Custom ROM, Custom Mods, Custom Kernels or any zip file such as Xposed. Read the guide carefully on How to Root and Install TWRP Recovery on Essential Phone PH-1.
Root Essential Phone (PH-1), Install TWRP and Unlock Bootloader
When you unlock the bootloader on your Essential PH-1, you open your device to a host of new possible tweaks. One popular modification is a custom kernel, which can not only speed up your phone, but give you new features that wouldn't be possible otherwise. The kernel controls the communication
Essential Phone Forum on XDA Developers
How to Pair a Bluetooth Device to Your Computer, Tablet, or Phone
0 comments:
Post a Comment