How To: Root Your Nexus 7 Tablet Running Android 4.4 KitKat (Windows Guide)
Whether you have the original Nexus 7, or the 2013 Nexus 7 tablet, rooting it will give you access to tomorrow's features, today.Sure, without root there's lots you can use it for. It's helped me get out of bed, became my own personal bartender, and a lot more.But with a rooted Nexus 7, you can install and use special features like KitKat's immersive mode, add extra swipe gestures, set separate home and lock screen wallpapers, and other cool Xposed Framework mods to personalize and automate your life.Rooting may sound like a tricky procedure, but it's really not. Thanks to an awesome root-kit made specifically for all Nexus devices (including both the 2012 and 2013 Nexus 7), the process for rooting is virtually painless.Update: There's a new root method available, and it's the easiest one yet. No need for USB cables, computers, drivers, or toolkits. Simply download an app, run it, and you're root 30 seconds later. Check out our guide here, it's worked flawlessly with 2013 Nexus 7's, but currently doesn't work for 2012 editions as well. Worst comes to worst, you can always come back to this guide, as that process does not erase any data. Please enable JavaScript to watch this video.
Before you begin, make sure you're on the latest version of Android, KitKat (version 4.4.X)—head to Settings -> About tablet -> System updates -> and hit Check now. If you're still on Jelly Bean, you may want to check out our previous rooting 4.3 guide for Windows, though the process is almost the same.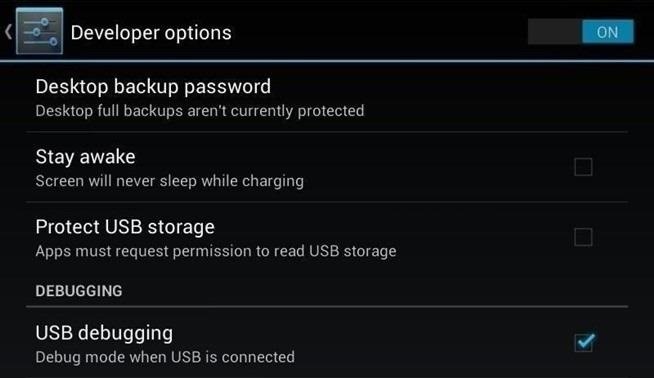
Step 1: Enable USB DebuggingYou need to allow the toolkit to make a connection to your Nexus, so you'll need to enable USB Debugging. Simply go into Settings -> Developer Options -> USB Debugging. If you don't see Developer Options, don't worry. Go into Settings -> About Device and tap on Build Number about 7 times. You'll see a toast notification pop up letting you know that you're a developer. Then simply go back and you'll see "Developer options."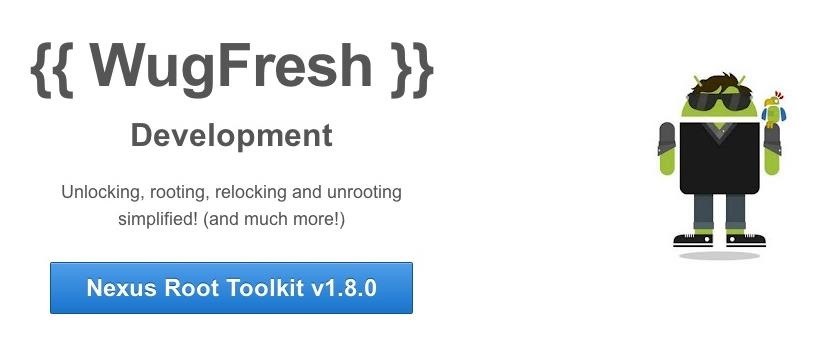
Step 2: Download & Install the WugFresh Nexus ToolkitIf you don't know, this kit is a Godsend—it literally does all of the heavy lifting for us. Head over to the WugFresh website and grab the latest version of the Nexus Root ToolKit, which has been updated with KitKat 4.4.2. compatibility. You can also grab the direct download here. Whenever you run the app, make sure to right-click on the icon and select "Run as administrator".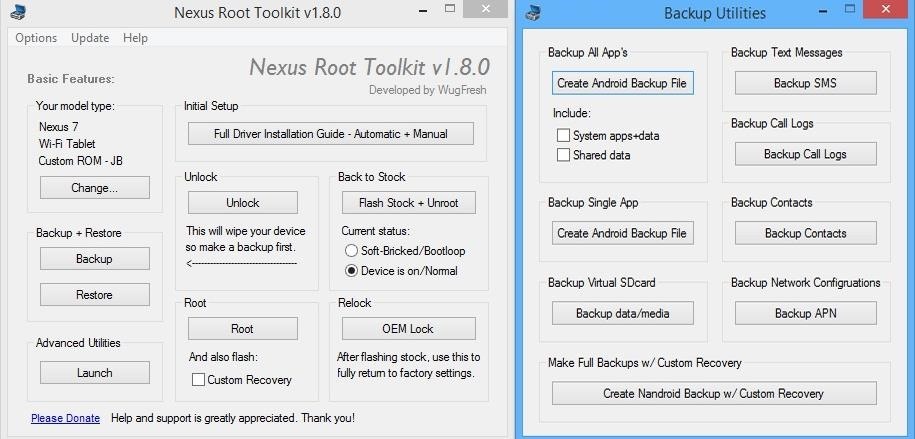
Step 3: Back Up Your NexusThe first step to rooting is unlocking the bootloader, which I'll get into a little later. Unfortunately, that process means that you'll need to wipe the data on your device. If you're not interested in starting fresh, the WugFresh toolkit has you covered. Select "Backup" from the left-most panel, then select the items you want to back up. In general, I only backup SMS and call logs because apps and contacts are restored once you sign in with your Google account.Unfortunately, app data is not restored automatically, so if you've got a great high score in Flappy Birds that you'd be sad to lose, you may want to back up your apps using the toolkit. Just select "Create Android Backup File," either under "Backup All Apps" or "Backup Single App." Alternatively, you can back up your Nexus 7 without root or a custom recovery using various other backup tools.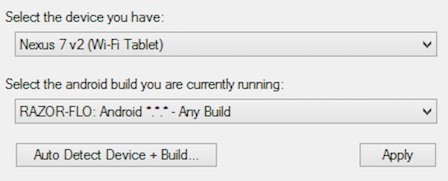
Step 4: Set Up the ToolkitWhen you initially launch the toolkit, you'll need to provide some basic information. Choose the specific Nexus device and build you have. If you're not sure what you input here, just select Auto Detect Device + Build. Next, you'll need to install the proper drivers for your device, if you didn't already do so through the backup process. All you do is select Full Driver Installation Guide and follow the simple instructions. After going through the driver installation, Unlock your device to make rooting possible. Unlocking will wipe the device.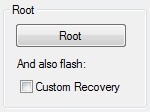
Step 5: Root Your Nexus 7Finally, you're ready to root. Check the Custom Recovery option to also apply TWRP custom recovery to your device, then click Root to initiate the process. With the custom recovery, you will have an extra step that includes tapping your screen a few times, but it's easy to follow with WugFresh. After the program runs its course, your device will be unlocked and rooted and will reboot.
Step 6: Make Sure You're RootedAn easy way to make sure the WugFresh toolkit worked and your Nexus 7 is rooted is to download the free Root Checker app from Google Play. Just open the app, select Verify Root, and wait for the results.
Unleashing WugFresh's Full PotentialNow that you've set up WugFresh with your device and are unlocked and rooted, let's quickly check out what else you can do with the toolkit. In the "Advanced Utilities" menu, you can take screenshots of your device, flash .zips without using a custom recovery, restore stock kernel and recovery, install apps (APKs), and much, much more.On the toolkit's main screen, you can also return your device to its original condition, removing root and re-locking the device. With WugFresh, the rooting process is extremely easy on Nexus devices. If you ran into any issues, just comment below and we'll help you out. And check out all of the Nexus7 softModder guides to start applying root-only mods to your device.
Cover image courtesy of Ministry127
Moving your photos, contacts, calendars, and accounts from your old Android phone or tablet to your new iPhone or iPad is easier than ever with Apple's Move to iOS app. Apple's first Android app, it hooks your old Android and new Apple device together over a direct Wi-Fi connection and transfers
How to Transfer Data from Android to iPhone (iPhone 8/X) via
Editor's Choice: 11 Camera Apps to Put Your Samsung Galaxy Note 2 on Steroids By Justin Put Your Samsung Galaxy Note 2 in Deep Sleep Mode to Save Battery Life
11 kameraapplikationer til at sætte din Samsung Galaxy Note 2
The screen is bigger in general, so there's more space your app can use. Your app content should not cover areas with a notch or native on-screen buttons. Otherwise, the elements you place at these parts of the screen are not accessible. To support different device models and screens, most apps use a responsive layout. This means that the
How to Make Your Phone Limit Your Screen Time for You - The
How to Play Chrome's Hidden Dinosaur Game Without Going Offline Justin Pot @jhpot September 7, 2018, 5:51pm EDT Chrome has a hidden endless runner game you can play whenever your computer or phone is offline, but it turns out you can also play it without disconnecting.
Chrome 101: How to Enable the Home Page Button on Any Android
The Ultimate Facebook Prank: How To "Kill" Your Friends on
Also, with CMTE, it was essential for the user to reboot their device, whereas upon using full Substratum mode, one can dynamically theme their device without the need to reboot. Furthermore, CMTE as a project has been left out ever since Android Nougat, while Substratum's development continues to grow.
15 Cool Substratum Themes You Can Try on Android (2017
Ask Your Question Fast! Hi friend,\ kindly add the ip address of your unit to your router to be able to access your wi fi . Make sure that you reset afterwards
Stop asking what diet your friends are on - YouTube
Have any old school floppy drives lying around? Hack the home and turn them into a music producing orchestra. This is a project using a myRIO, midi files, LabVIEW and FPGA to make music.
James Charles Edward Willis's Profile « Wonder How To
This tutorial teaches you how to download sheet music from movies, video games, and tv series. Learn to modify the sheet music to transpose the notes to any instrument and print it out. Again if you can get sibelius or finale, it might be better but Noteworthy Composer works fine.
Download Free Sheet Music For Any Instrument From - YouTube
Luckily, there's an easy way to get the regular dock icons from your home screen in the new multitasking view. Disabling App Suggestions. To get your regular dock icons from your home screen to appear in Android Pie's new app switcher menu, you'll simply have to disable App Suggestions.
How to Use the New Multitasking Gestures in Android 9.0 Pie
News: iOS 11.4.1 Beta 4 Released for iPhones, Includes Only 'Bug Fixes' & Unknown Improvements News: Apple's iOS 12.1.3 Public Beta 2 for iPhone Released to Software Testers News: Apple Releases iOS 12.1 Beta 1 to Public Software Testers, Reintroduces Group FaceTime to iPhones
Apple Releases iOS 12.3 Beta 5 for iPhone to Developers
Since these files are stored as ZIP archives, you can also open an IPSW file using a file zip/unzip tool, the free 7-Zip being one example. This lets you see the different DMG files that make up the IPSW file, but you can't apply the software update to your Apple device this way — iTunes still needs to use the IPSW file.
2 Ways to Convert ZIP to RAR File on Windows 10 - Isumsoft
Your Mac uses its processor, graphics chip, and display when it shows a screen saver. To save energy, you can use Energy Saver preferences to choose how long your Mac needs to be inactive before the display turns off or goes to sleep.
How To Make A Clock Screensaver Mac - printscreenmac.com
Turn your Samsung Galaxy Tab into an alarm clock with a few simple steps. The alarm works through the Clock app. You can create as many alarms as you want, and you can choose any ringtone or no ringtone at all. In that case, you'll likely want to set the tablet to vibrate. The steps also apply to
How to Use the Alarm Clock on Your Galaxy Tab - dummies
0 comments:
Post a Comment