How To: Root the Nexus 6 Using Windows, Mac, or Linux
Google's latest Nexus device is big, bold, and beautiful—and now it's got root. Thanks to some quick work by legendary Android developer Chainfire, the Nexus 6 already had a clear-cut root method before most stores even had it in stock.CF Auto Root is a wonderful tool that has already helped root thousands of devices in one simple click. And since the utility works on Windows, Mac, and Linux, almost any Nexus 6 owner can have Superuser privileges in just a few minutes. Please enable JavaScript to watch this video.
Step 1: Put Your Phone into Bootloader ModeTo begin, power your Nexus 6 completely off. When the screen goes black, press and hold the Volume Down and Power buttons simultaneously. This will bring up Android's Bootloader menu, and at this point, you should connect your phone to your computer with a USB data cable.
Step 2: Ensure That You Have the Proper Drivers InstalledIn order for CF Auto Root to work its magic, your computer and your Nexus 6 need to be able to communicate properly. Most systems will automatically download the necessary device drivers to make this happen, but others will require that you do this manually. If you're not sure if you have the proper drivers installed already, I'd advise that you install them yourself.If you own a Windows PC, you can download the proper drivers at this link. Simply run the file, then follow the prompts, and you'll be all set up.If you're a Linux user, download and extract this ZIP file, then run the script with Terminal.For Mac users, the process of installing the proper drivers is a bit more involved. Refer to our guide on the topic for more information.
Step 3: Download & Extract CF Auto RootChainfire's awesome root tool can be downloaded at this link. Once you have the ZIP file saved to your computer, extract its contents to any folder on your system.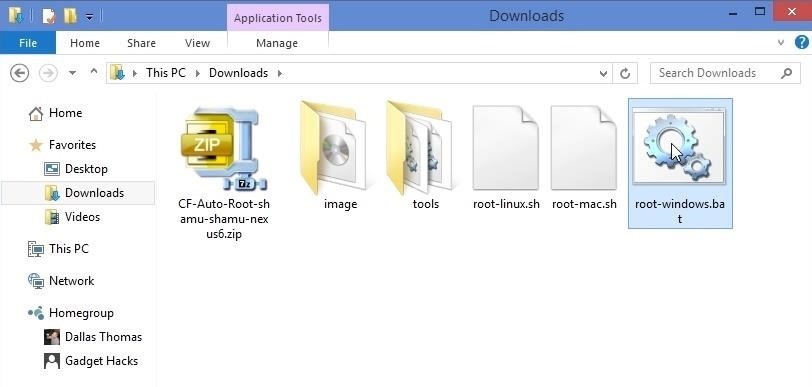
Step 4: Run CF Auto RootWith the ZIP extracted, you'll find 2 folders and 3 files—root-linux.sh, root-mac.sh, and root-windows.bat. Double-click the file that corresponds to your computer's operating system to begin. From here, a command prompt window will inform you that CF Auto Root will unlock your device's bootloader before it performs the rooting procedure. If your bootloader is not already unlocked, this process will wipe your device, so make sure you have everything backed up.When you're ready, press any key on your keyboard to execute the script. If your bootloader was previously locked, you should see a red Android logo on your phone's screen for about a minute. Otherwise, CF Auto Root will skip directly to the rooting process, and you'll see a wall of text scrolling by on your phone's screen for about 10 seconds.When the process is complete, your phone will automatically reboot, and you'll be rooted. At this point, it's safe to unplug your Nexus 6 from your computer.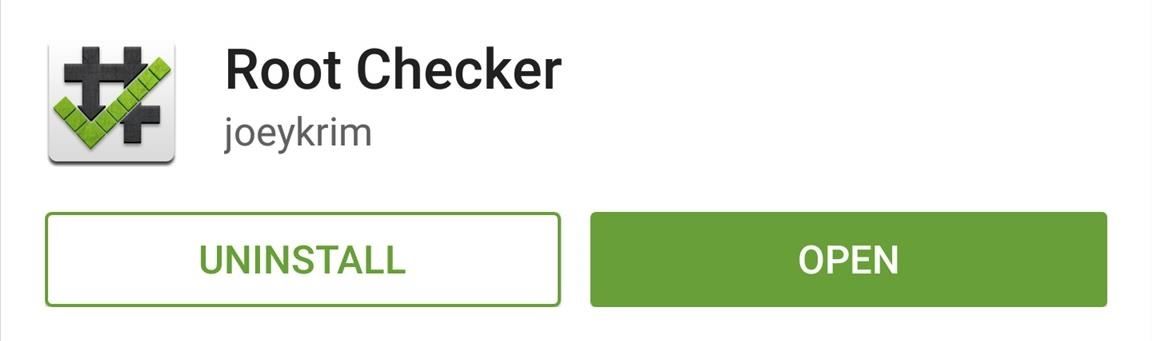
Step 5: Verify RootTo verify that your Nexus 6 is indeed rooted, download Root Checker from the Google Play Store for free. From there, simply run the app, then tap Grant on the Superuser request popup. If everything went off without a hitch, Root Checker will give you a message that says Congratulations! This device has root access! Thanks to an incredible development community, the Nexus 6 is one of the easiest devices to root. What root apps did you install first? Let us know in the comment section below, or drop us a line on our Facebook or Twitter feeds.
How to enable Flash notification in Samsung Galaxy A5-2016(SM-A510FD)? Last Update Date : May 10. 2018 When it comes to getting notifications or alerts for incoming calls or SMS messages, there's a few different options available.
The Galaxy S10 Doesn't Have a Notification LED — Here's Why
The Quick Access feature in Windows 10 lets you access frequently used files and folders easily. However, you might want to clear it out periodically. How to Clear Windows 10 Quick Access History
Zynga's Farmville for iPhone Brings Your Farm to You but one of the most important is that the farm you play on your iPhone, iPod touch, or iPad is the same farm you play on Facebook. This
How do you load Farmville on iPhone - answers.com
Your iPhone can store valuable data about fitness, nutrition, heart health, and so much more. And since iOS 11.3, your iPhone can even import a list of allergies, medications, immunizations, hospital visits, and other health information from your doctor or hospital.
How to move your Health data to a new iPhone or Apple Watch
Need a quick repair job for your HP iPAQ Pocket PC H4150 or H4155? Well, this video tutorial will show you how to disassemble the phone after it's been damaged. You'll see exactly how to take it apart, then simply reverse the instructions to put the HP iPAQ H4150 or H4155 back together. 1. Take out
HP iPAQ hw6515 Screen Repair & Replacement Directions
New tutorial for Lens Whacking Technique here:
Do you see spam or useless websites in your Google search results? This video tutorial will show you how to solve this problem in Google chrome browser. Category
How to Block Porn from Google Search - wikiHow
Most of us know how to add homescreen shortcuts to apps that already exist on our phones - just open up the app drawer, hold down on an app icon until you grab it, then drag it over to the homescreen of your choice. But maybe you want to create app-like shortcuts to specific folders, web pages, or
How to Create App Shortcuts on Android - Gadget Hacks
How To: Android's Built-In Scanner Only Catches 15% of Malicious Apps—Protect Yourself with One of These Better Alternatives News : eBay Vulnerability Allows Scammers to Attack Android & iOS with Malicious Programs
How to Sync Your Android Text Messages and Phone Calls with
How To: Use a rotary cutter How To: Build a ghost phone out of an old rotary phone and headphones How To: Do rotary calf exercises How To: Cut fabric using a rotary cutter for sewing beginners How To: Make a PVC Hand Pump to Move Water, Compress Air, & Create Vacuum
How to Use and dial the rotary telephone in 1927 « Home
Step 5: Customize Your Navigation Bar. If your device passed through the app's testing and is shown to be compatible, you can now customize your navigation bar. You have multiple options for doing so, and can set the button layout to standard, compact, left or right oriented, and tablet mode.
Step 6: Use Floating Apps on Tablet. If you have Android tablet, install Floating Apps on it as experince from using multitasking is multiplied by ten on bigger screen. Step 7: You Are Now Able to Do More Things at the Same Time. You have Floating Apps set up on your phone (or tablet) and it's up to you when and where you use each of them.
How to Use the Floating Apps (Android Multitasking
If you are a parent trying to protect your children from websites you don't want them to see or just a person who doesn't want to stumble upon certain websites by accident then this video is perfect for you. By using Net Nanny you can block any website you want in a fast and simple way.
4 Ways to Bypass Net Nanny - wikiHow
How To: Hide Your Nexus 7's Soft Keys to Maximize Usable Screen Space How To: Unlock the Electronic Image Stabilization Feature on Your Nexus 5X How To: Show Battery Percentage in Your Nexus 6's Status Bar Without Rooting How To: Turn Your Nexus 4 into an Android/iOS Hybrid
No LED Flash on Your Android Device? Use Your - Nexus 7
0 comments:
Post a Comment